By: Team CS2103T-W16-1 Since: Mar 2020
- 1. Setting up
- 2. Design
- 3. Implementation
- 4. Documentation
- 5. Testing
- 6. Dev Ops
- Appendix A: Product Scope
- Appendix B: User Stories
- Appendix C: Use Cases
- Appendix D: Non Functional Requirements
- Appendix E: Glossary
- Appendix F: Instructions for Manual Testing
- F.1. Launch and Shutdown
- F.2. Viewing Relevant Screens on command
- F.3. Adding a task
- F.4. Editing a task
- F.5. Adding and triggering a reminder for the task
- F.6. Adding a recurring attribute to a task
- F.7. Sorting the task list
- F.8. Finding a task
- F.9. Auto complete
- F.10. Activating Pomodoro
- F.11. Switching tabs
- F.12. Checking Statistics
1. Setting up
Refer to the guide here.
2. Design
2.1. Architecture
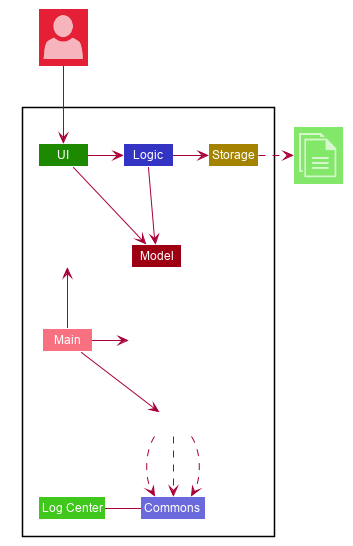
The Architecture Diagram given above explains the high-level design of the App. Given below is a quick overview of each component.
The .puml files used to create diagrams in this document can be found in the diagrams folder.
Refer to the Using PlantUML guide to learn how to create and edit diagrams.
|
-
At app launch: Initializes the components in the correct sequence, and connects them up with each other.
-
At shut down: Shuts down the components and invokes cleanup method where necessary.
Commons represents a collection of classes used by multiple other components.
The following class plays an important role at the architecture level:
-
LogsCenter: Used by many classes to write log messages to the App’s log file.
The rest of the App consists of four components.
Each of the four components
-
Defines its API in an
interfacewith the same name as the Component. -
Exposes its functionality using a
{Component Name}Managerclass.
For example, the Logic component (see the class diagram given below) defines it’s API in the Logic.java interface and exposes its functionality using the LogicManager.java class.

How the architecture components interact with each other
The Sequence Diagram below shows how the components interact with each other for the scenario where the user issues the command delete 1.
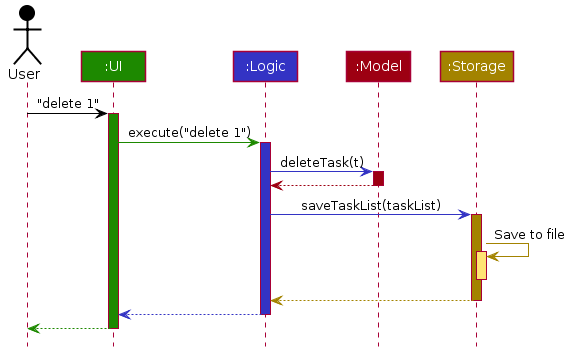
delete 1 commandThe sections below give more details of each component.
2.2. UI component
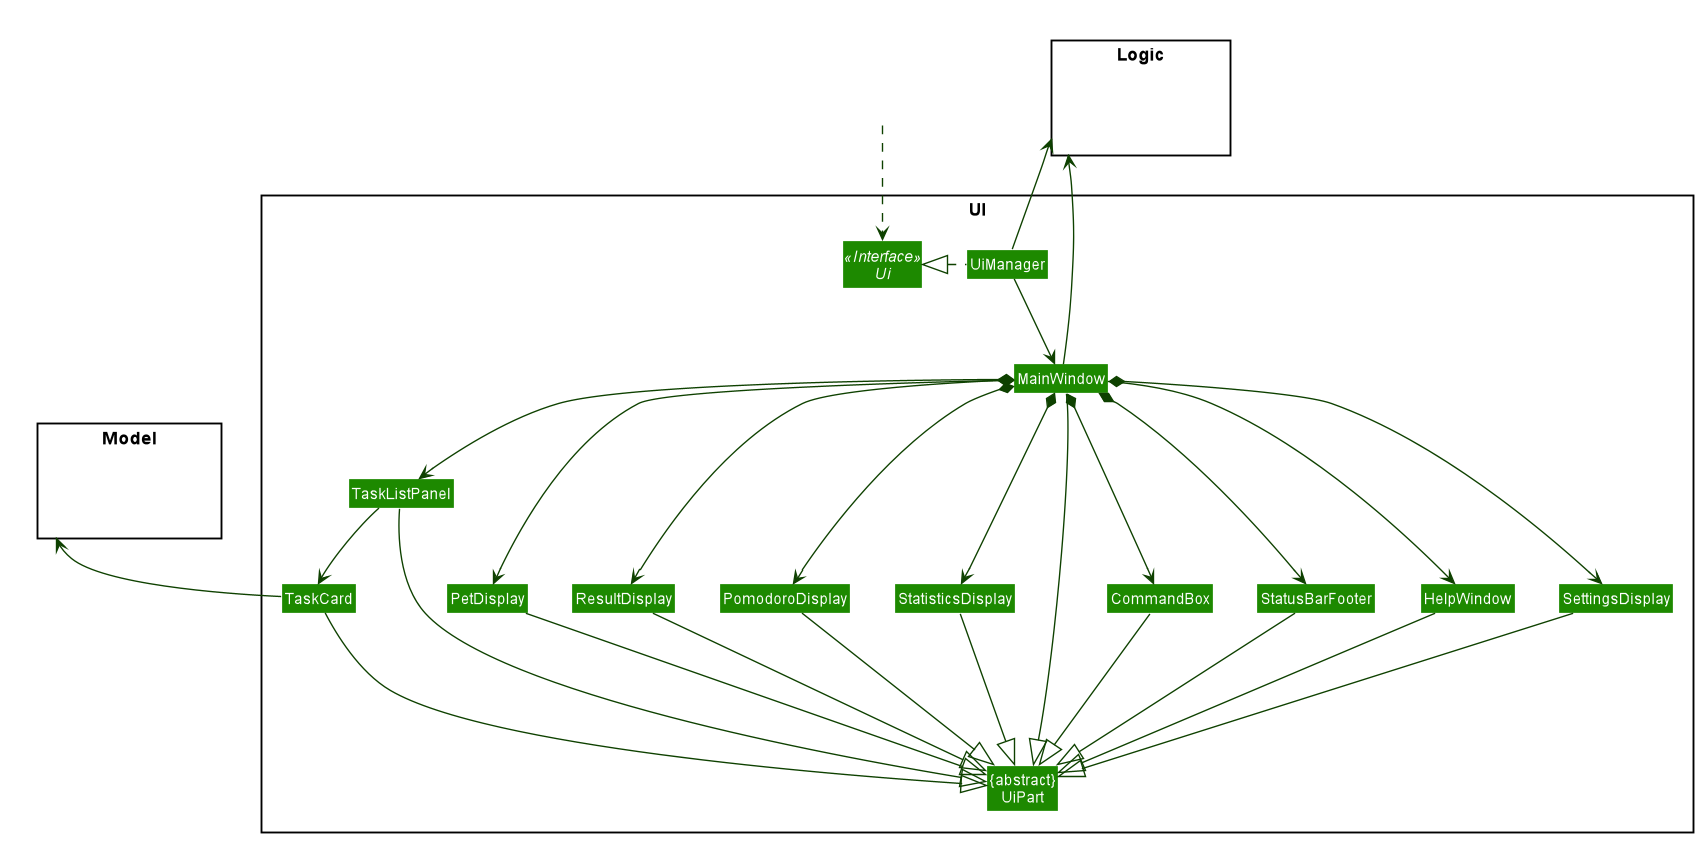
API : Ui.java
The UI consists of a MainWindow that is made up of parts e.g.CommandBox, ResultDisplay, PomodoroDisplay, StatisticsDisplay, PetDisplay etc. All these, including the MainWindow, inherit from the abstract UiPart class.
The UI component uses JavaFx UI framework. The layout of these UI parts are defined in matching .fxml files that are in the src/main/resources/view folder. For example, the layout of the MainWindow is specified in MainWindow.fxml
The UI component,
-
Executes user commands using the
Logiccomponent. -
Listens for changes to
Modeldata so that the UI can be updated with the modified data.
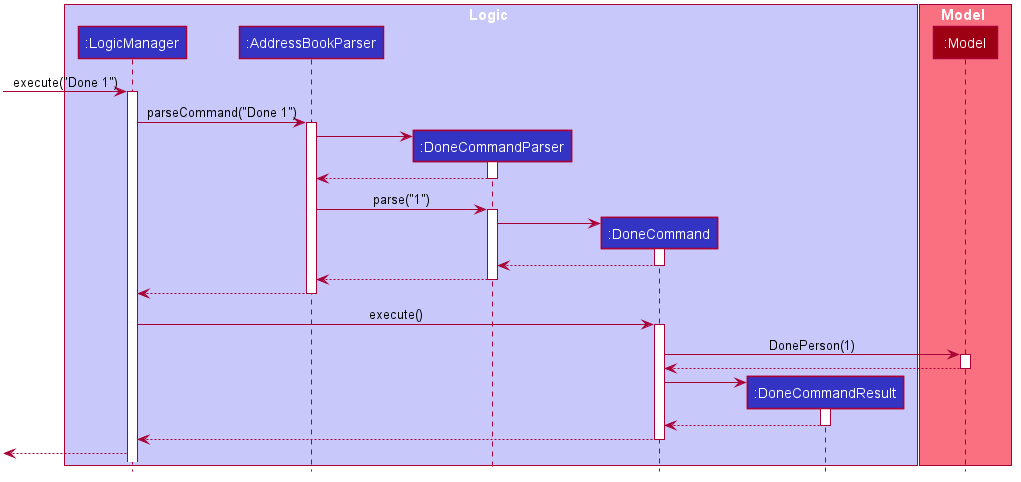
2.3. Logic component
API :
Logic.java
-
Logicuses theTaskListParserclass to parse the user command. -
This results in a
Commandobject which is executed by theLogicManager. -
The command execution can affect the
Model(e.g. adding a task). -
The result of the command execution is encapsulated as a
CommandResultobject which is passed back to theUi. -
In addition, the
CommandResultobject can also instruct theUito perform certain actions, such as displaying help to the user or highlighting the text input field with a certain color.
Given below is the Sequence Diagram for interactions within the Logic component for the execute("delete 1, 2") API call.
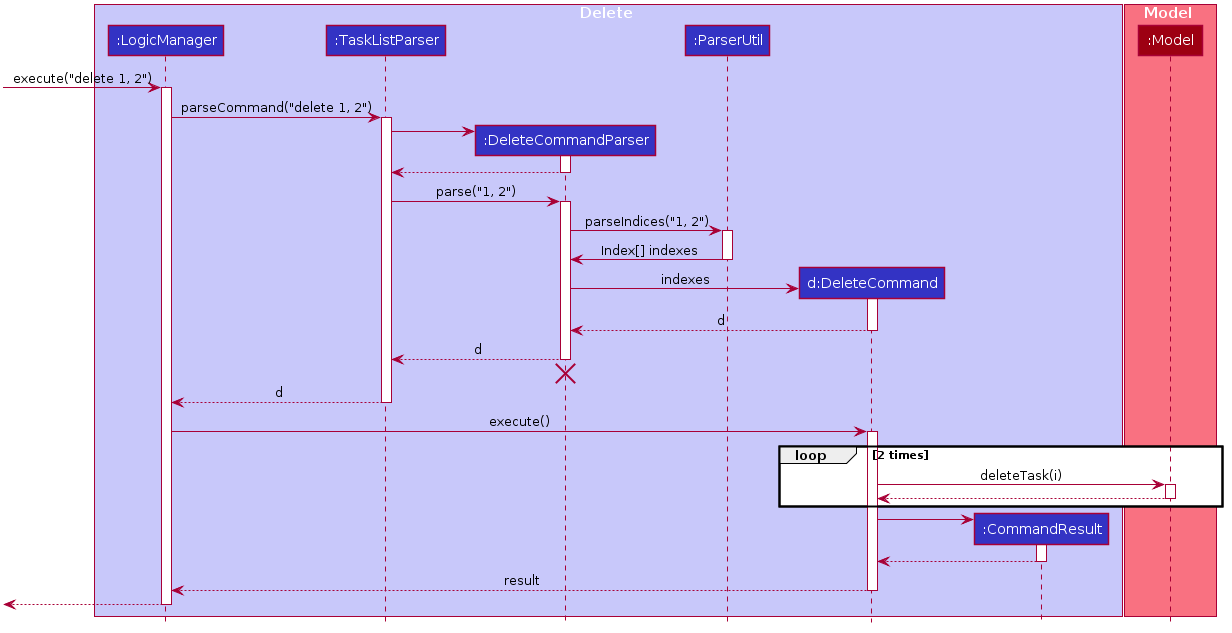
delete 1, 2 Command
The lifeline for DeleteCommandParser should end at the destroy marker (X) but due to a limitation of PlantUML, the lifeline reaches the end of diagram.
|
2.4. Model component
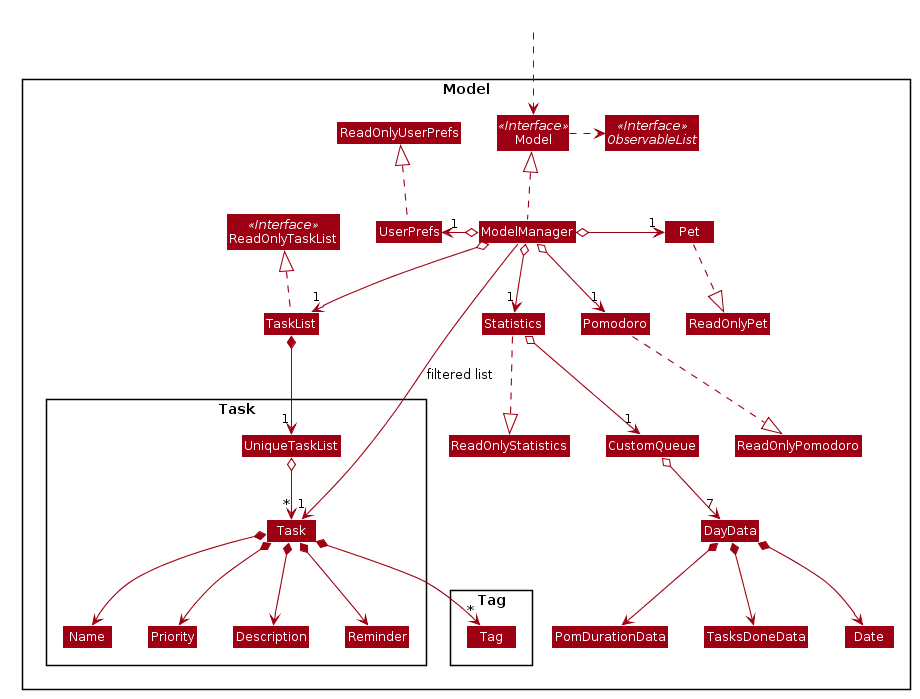
API : Model.java
The Model,
-
stores a
UserPrefobject that represents the user’s preferences. -
stores the Task List, Pet, Pomodoro and statistics data.
-
exposes an unmodifiable
ObservableList<Task>that can be 'observed' e.g. the UI can be bound to this list so that the UI automatically updates when the data in the list change. -
does not depend on any of the other three components.
As a more OOP model, we can store a Tag list in Address Book, which Person can reference. This would allow Address Book to only require one Tag object per unique Tag, instead of each Person needing their own Tag object. An example of how such a model may look like is given below.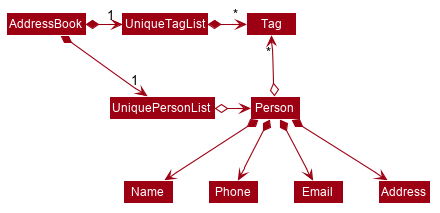
|
2.5. Storage component
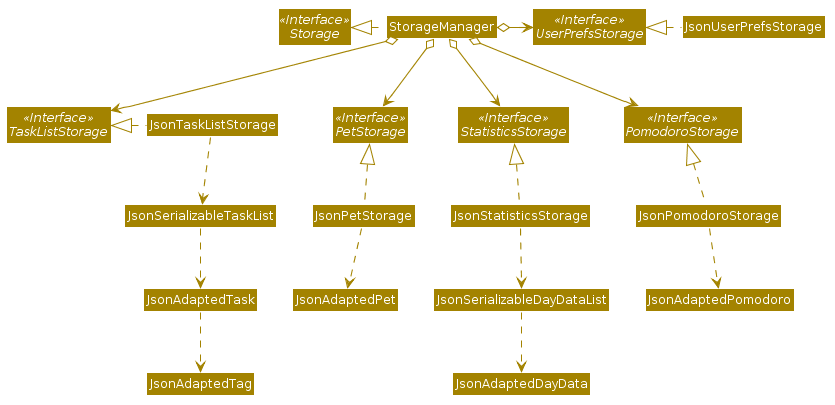
API : Storage.java
The Storage component,
-
can save
UserPrefobjects in json format and read it back. -
can save the Task List data in json format and read it back.
-
can save the Pet data in json format and read it back.
-
can save the Pomodoro data in json format and read it back.
-
can save the Statistics data in json format and read it back.
2.6. Common classes
Classes used by multiple components are in the seedu.addressbook.commons package.
3. Implementation
This section describes some noteworthy details on how certain features are implemented.
3.1. TaskList
Shown below is a high level overview of task class and related classes. This is represented in a class diagram.
3.1.1. Add
Implementation
The Add feature allows the user to add a Task. Its only compulsory field is Name. Description, Priority, Reminder, Recurring and Tag are optional fields.
Default Priority of 'low' is assigned if it is not specified.
|
| The user can specify multiple `Tag`s. |
The mechanism of how SwitchTabCommand updates the Ui is described below through an example usage.
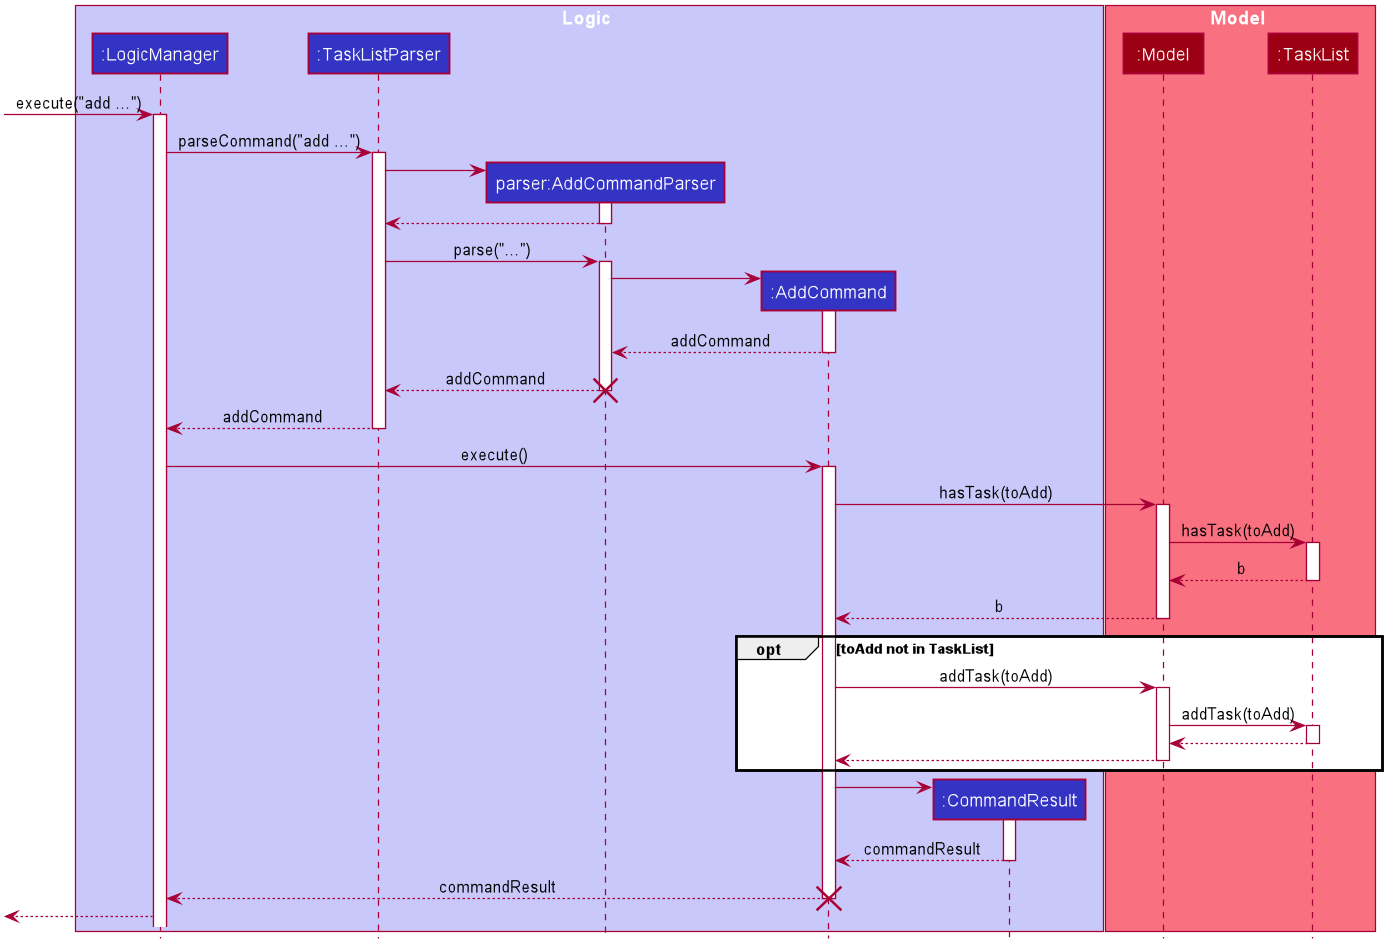
Step 1. The user executes add n/Homework 1 des/Read up on Semaphotes p/3 to add a new Task. LogicManager calls execute on this inputs.
Step 2. TaskListParser creates an AddCommandParser to parse this input. AddCommandParser creates the relevant objects for the fields specified in input. Based on the input, it creates a Task with its assigned Name, Priority and Description.
Step 3. AddCommandParser returns a new AddCommand with the newly created Task as its only argument to LogicManager.
Step 4. AddCommand executes. It checks if the TaskList contains a duplicate Task to it through Model#hasTask. If a duplicate Task exists, a CommandException is thrown. If not, it adds the new Task into the Tasklist through Model#addTask.
Step 5. AddCommand creates and return the resulting CommandResult to the Ui.
The following sequence diagram shows how the AddCommand is executed.
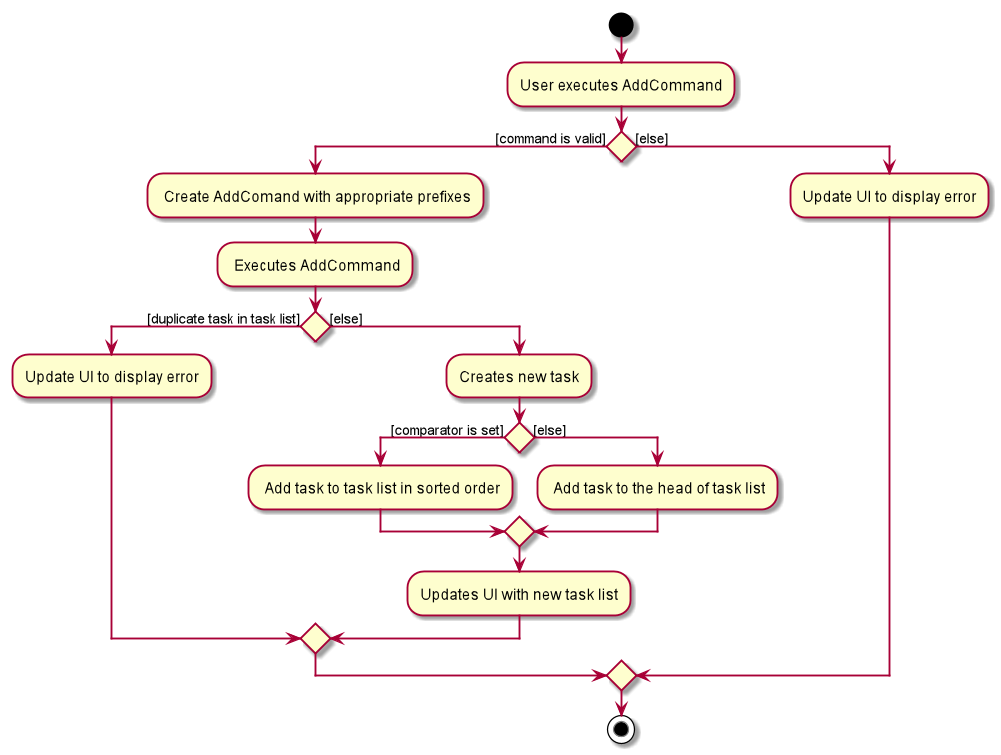
The following activity diagram summarises what happens when the AddCommand is executed.
3.1.2. Edit
The edit feature allows the user to edit the task, adding or updating fields in a task accordingly.
Implementation
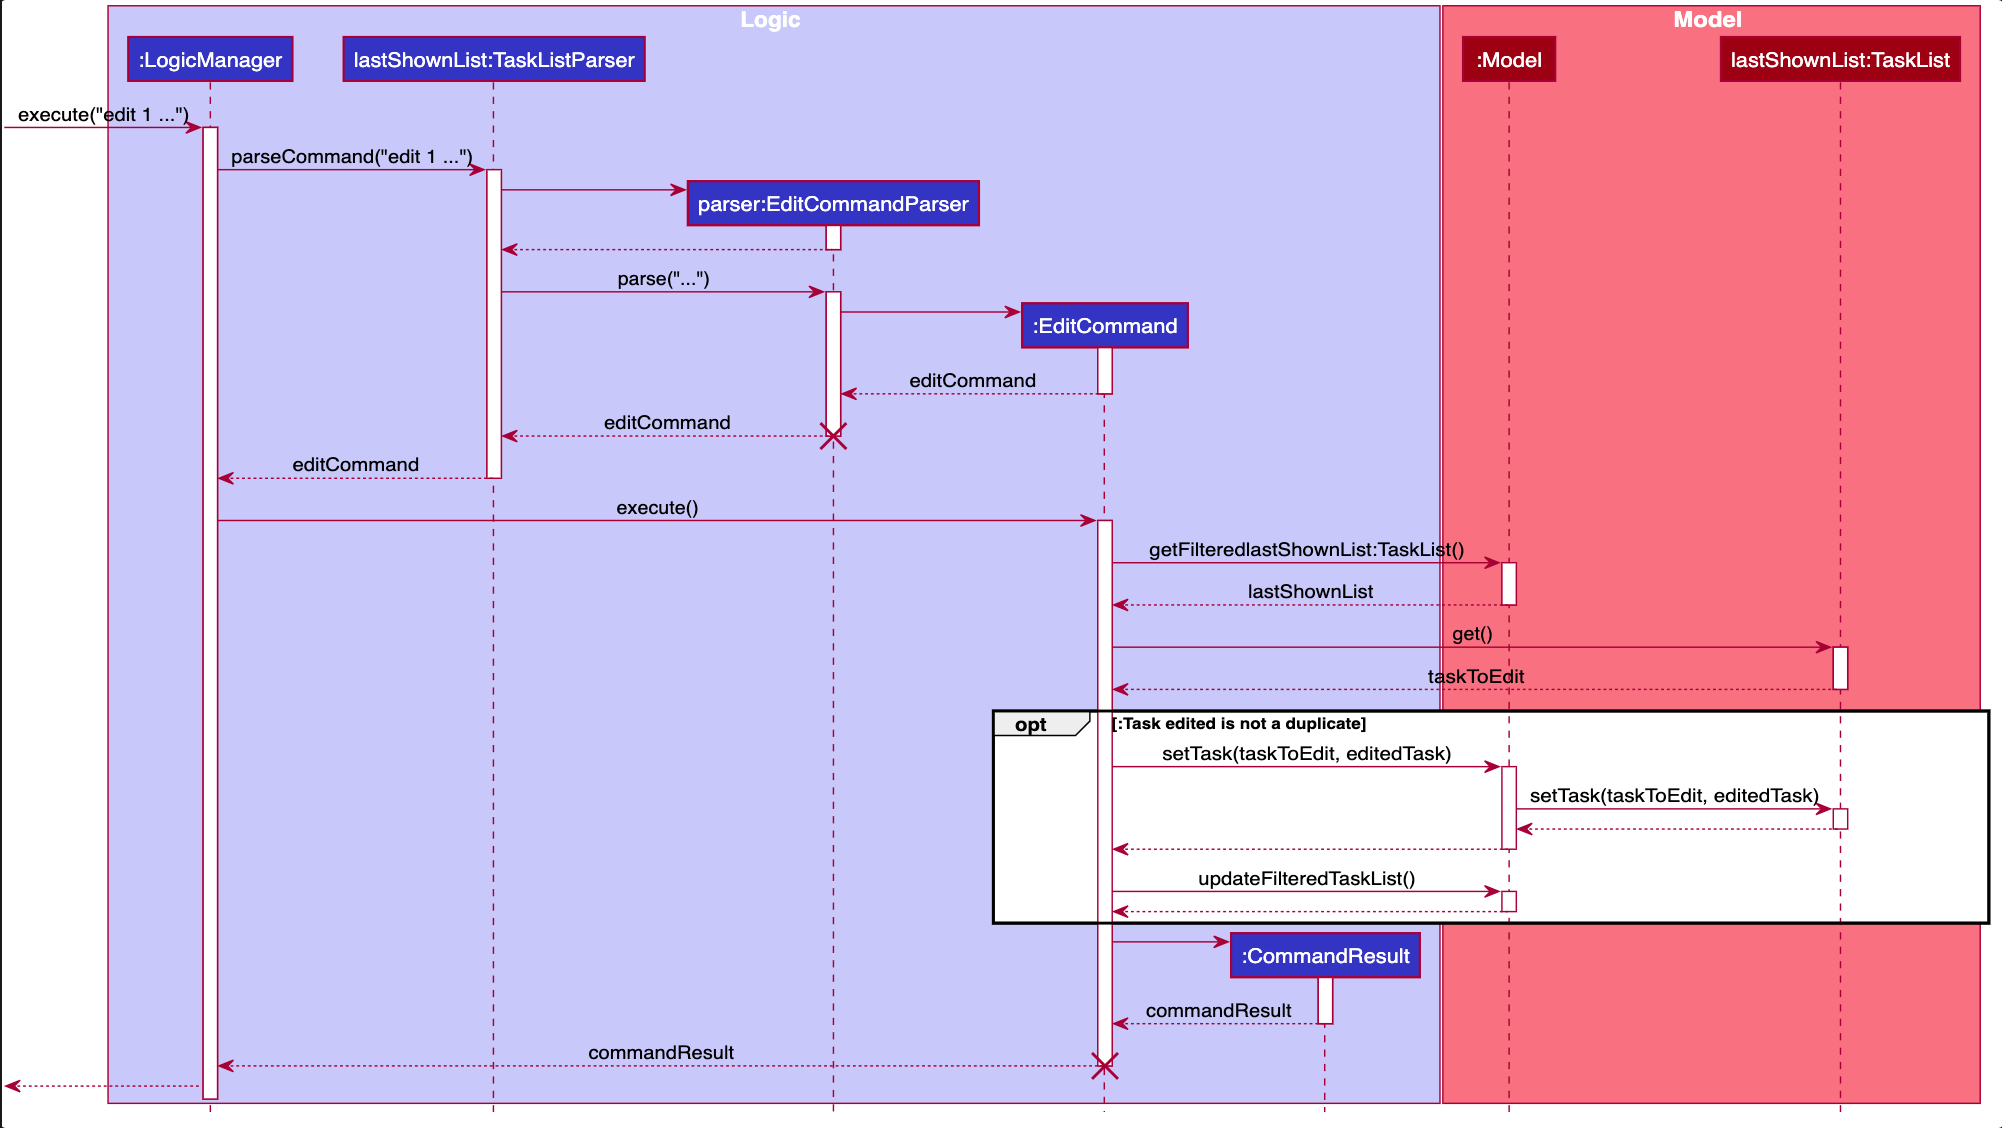
The edit command is done in 2 parts. EditCommandParser as well as EditCommand itself.
EditCommandParser parses the user input including the index and the relevant prefixes that will be edited. This is done by checking the prefixes for each of the different task fields and calling the relevant parser for it. The parser then returns the relevant field, be it name, priority, reminder etc and this is set in the EditTaskDescriptor instance. This EditTaskDescriptor instance is a container for the updated fields. This instance is passed in the constructor of a new EditCommand.
EditCommand is executed. During execution, an edited task is created from retrieving the stored updated fields data from EditTaskDescriptor and copying the field from the original task to edit for the unchanged fields. This updated task is set in the Model for storage. Subsequently, a new CommandResult is generated to display that the task has been edited in the result display to the user. The general flow of EditCommand and EditCommandParser can be seen in the sequence diagram below.
3.2. Sort
|
The sort order is not maintained after the application closes |
3.2.1. Implementation
API : SortCommand.java
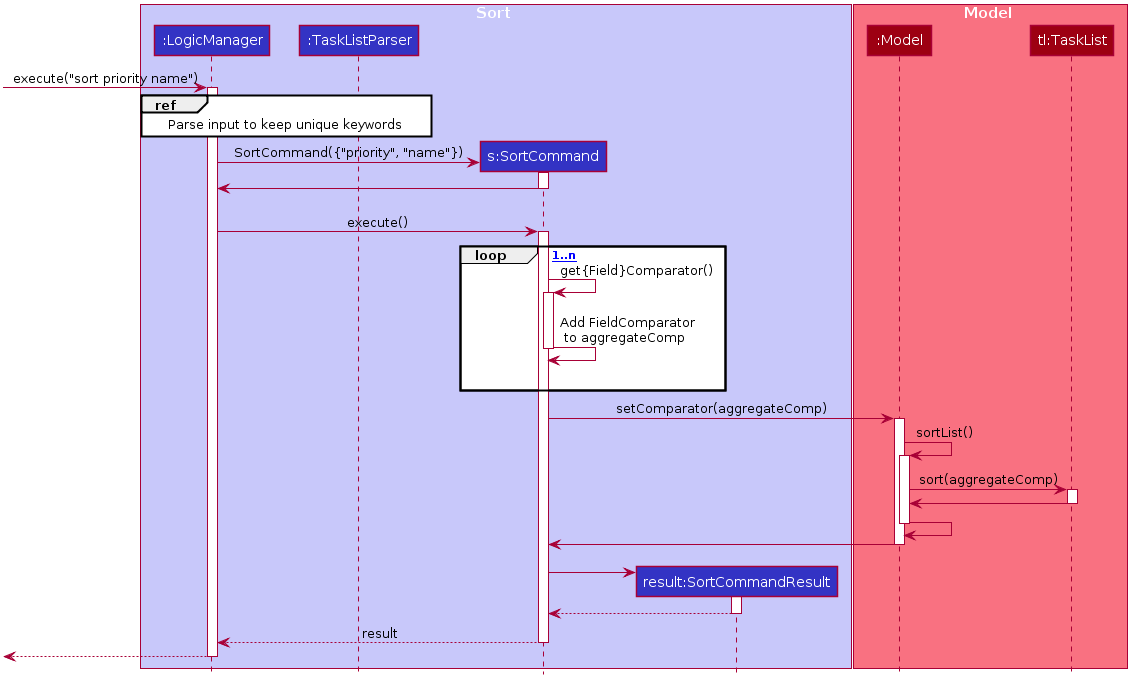
The sort command takes in a list of fields and generates FieldComparators as seen in the diagram and then uses Comparator.thenComparing to aggregate the comparators. The first field provided will be of the highest sort order. The Model will then set the aggregated comparator on the TaskList.
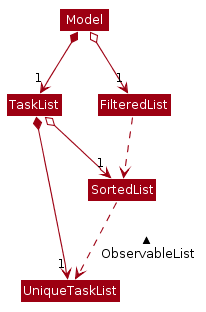
We use a new SortedList from JavaFx within TaskList because FilteredList does not allow for sorting. As such we have the FilteredList reference the SortedList and the SortedList refernce the UniqueTaskList. By warpping the lists around another, this allows the SortedList and FilteredList to read changes to the UniqueTaskList and perform the appropriate filtering and sorting.
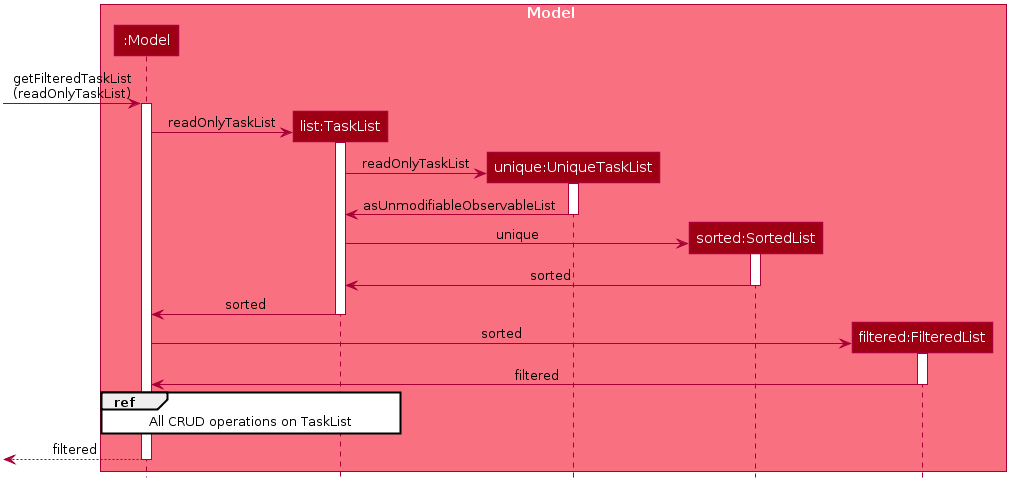
Due to the requirements mentioned, this is how we generate our FilteredList. We set FilteredList to reference the SortedList and then the SortedList to reference the UniqueTaskList.
3.2.2. Updating UI
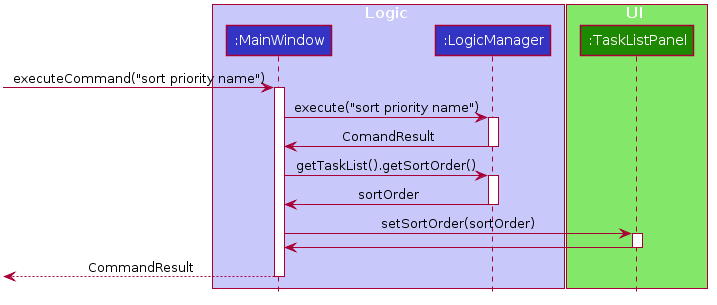
Meanwhile to update the UI on the newest sorting order, the latest sortOrder is set on the TaskList. The LogicManager is then able to access the sort order from the TaskList throgh the Model and provide the MainWindow with the sort order. The MainWindow then sets it on the TaskListPanel.
3.3. AutoComplete
Auto complete is triggered when users press tab while focussed on the command line.
3.3.1. Implementation
API : CommandCompletor.java
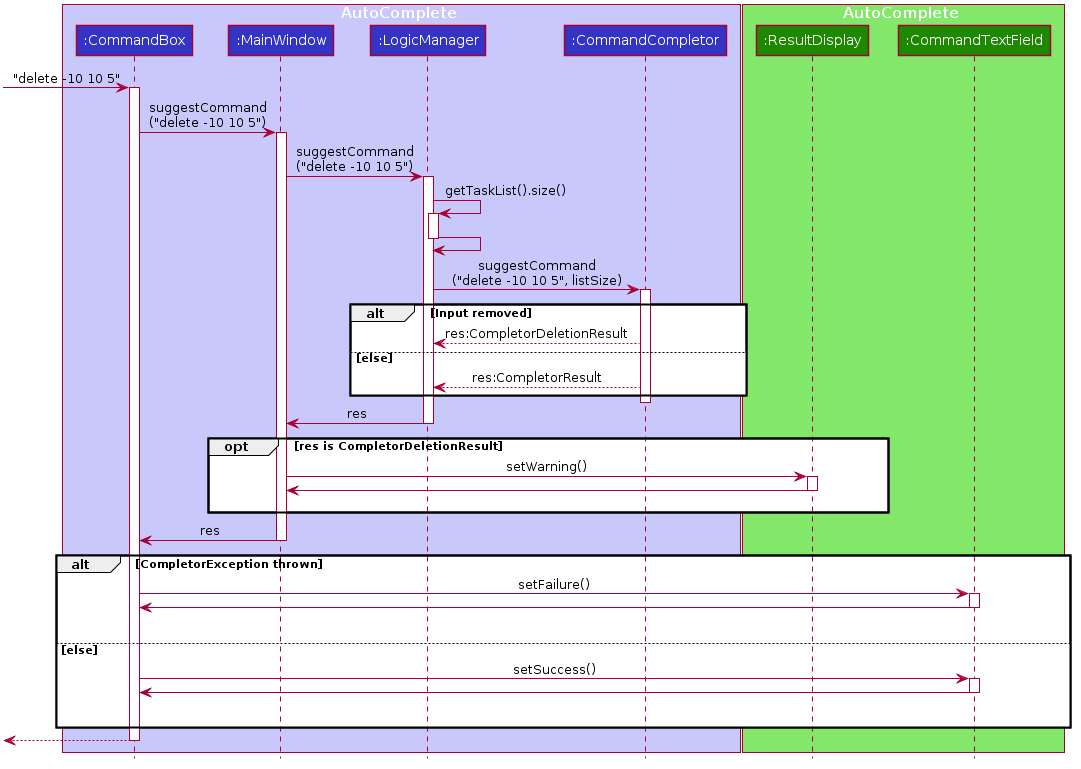
When a user presses tab on the command line, a key event handler in the CommandBox calls the suggestCommand function of MainWindow with the user input. The MainWindow then passes the user input through the LogicManager to the CommandCompletor.
The input is pass through the LogicManager so that we can get TaskList details from the LogicManager and transfer it to the CommandCompletor (e.g. taskList length). The CommandCompletor then parses the input and returns one of three things which lead to different changes to the UI:
-
CompletorResult-
Will cause
CommandBoxto setSuccess onCommandTextField
-
-
CompletorDeletionResult[inherits fromCompletorResult]-
Contains deleted input which will be shown as feedback
-
Will cause
MainWindowto call setWarning onResultDisplay
-
-
CompletorException-
Will cause
CommandBoxto setFailure onCommandTextField
-
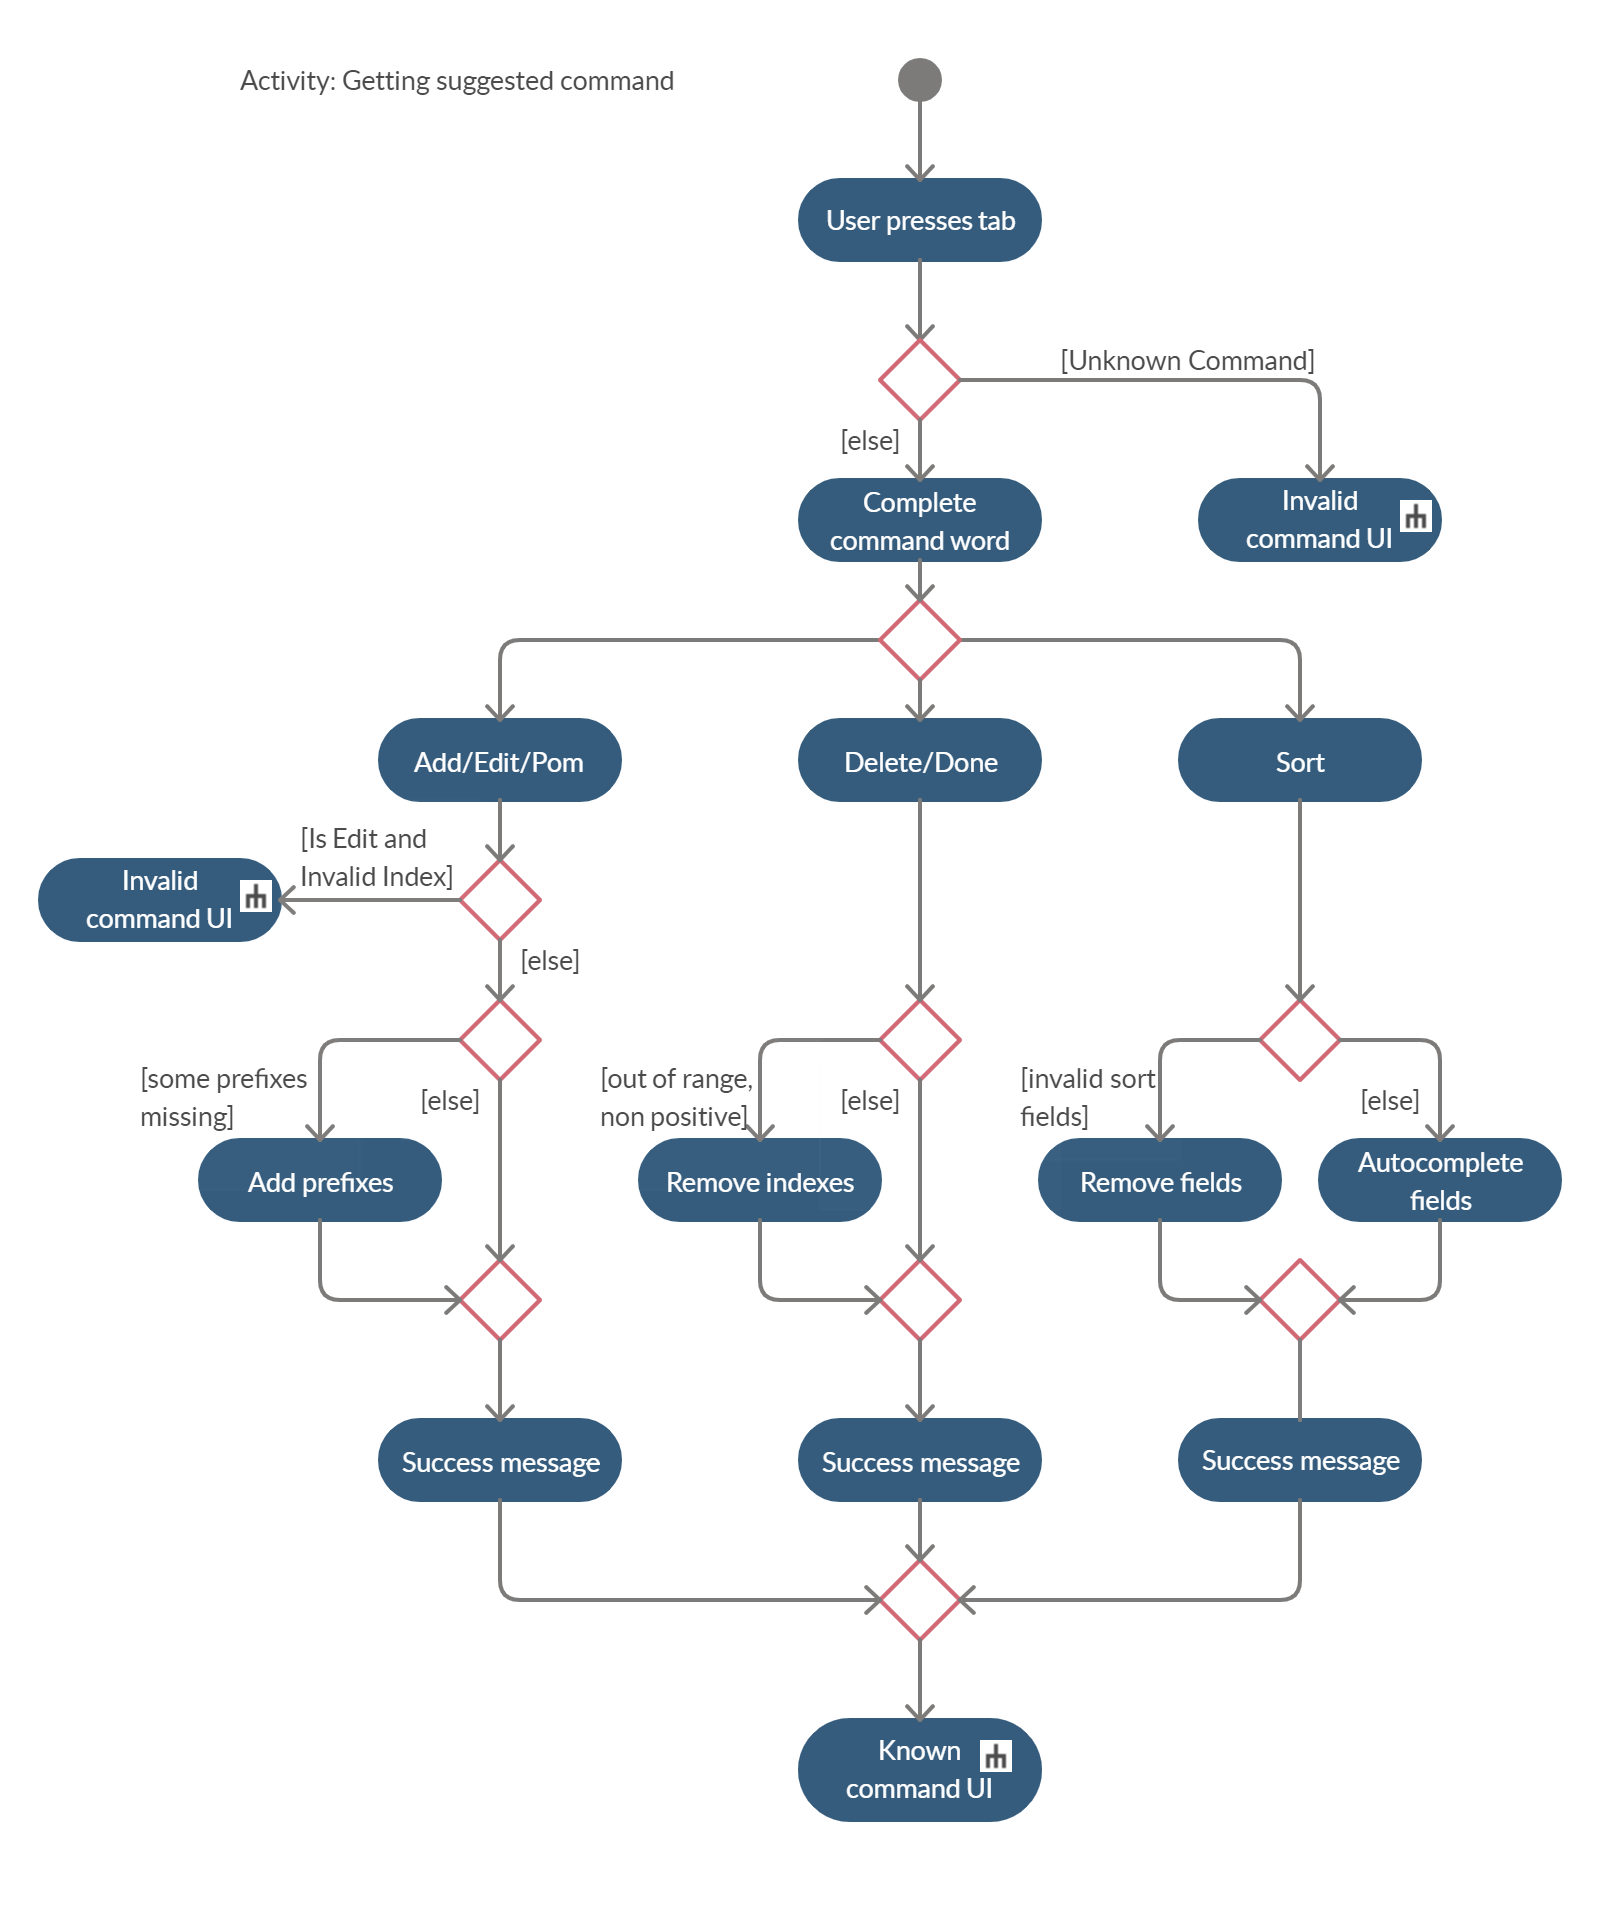
3.3.2. Auto Complete Overview
|
Auto completion of a word happens when either:
|
The above diagram provides a big picture overview of decisions CommandCompletor goes through when processing user input.
-
It attempts to complete the command word as in the callout above
-
if command word is unrecognized,
CommandCompletorthrows aCompletorExceptionwhich leads to Unknown Command UI -
else it performs argument checks and auto completes as necessary
-
Argument checks overview
-
If the input is an add/edit/pom command then
CommandCompletorwill attempt to add prefixes.-
add/edit command → add priority and reminder prefixes
-
Edit auto complete will only add prefixes after the second word to avoid adding a prefix to the compulsory INDEX field of edit commands
-
-
pom command → add timer prefix
-
-
If input is a delete/done command
-
remove any invalid indices that are greater than the length of the displayed task list or that are not a positive integer
-
-
If input is a sort command
-
Auto completion of fields is performed based on the criteria
-
If the field is not recongized, then it is removed
-
3.3.3. Auto Complete output:
As seen from the activity diagram above:
-
Known Command UI is displayed when:
-
Any kind of completion has happened or nothing has changed for the input
-
CompletorResultis returned
-
-
Any input is deleted (invalid index or sort field)
-
CompletorDeletionResultis returned
-
-
-
Unknown Command UI is displayed when:
-
Command word provided is not recognized
-
CompletorExceptionis raised
-
-
3.3.4. Known Command UI
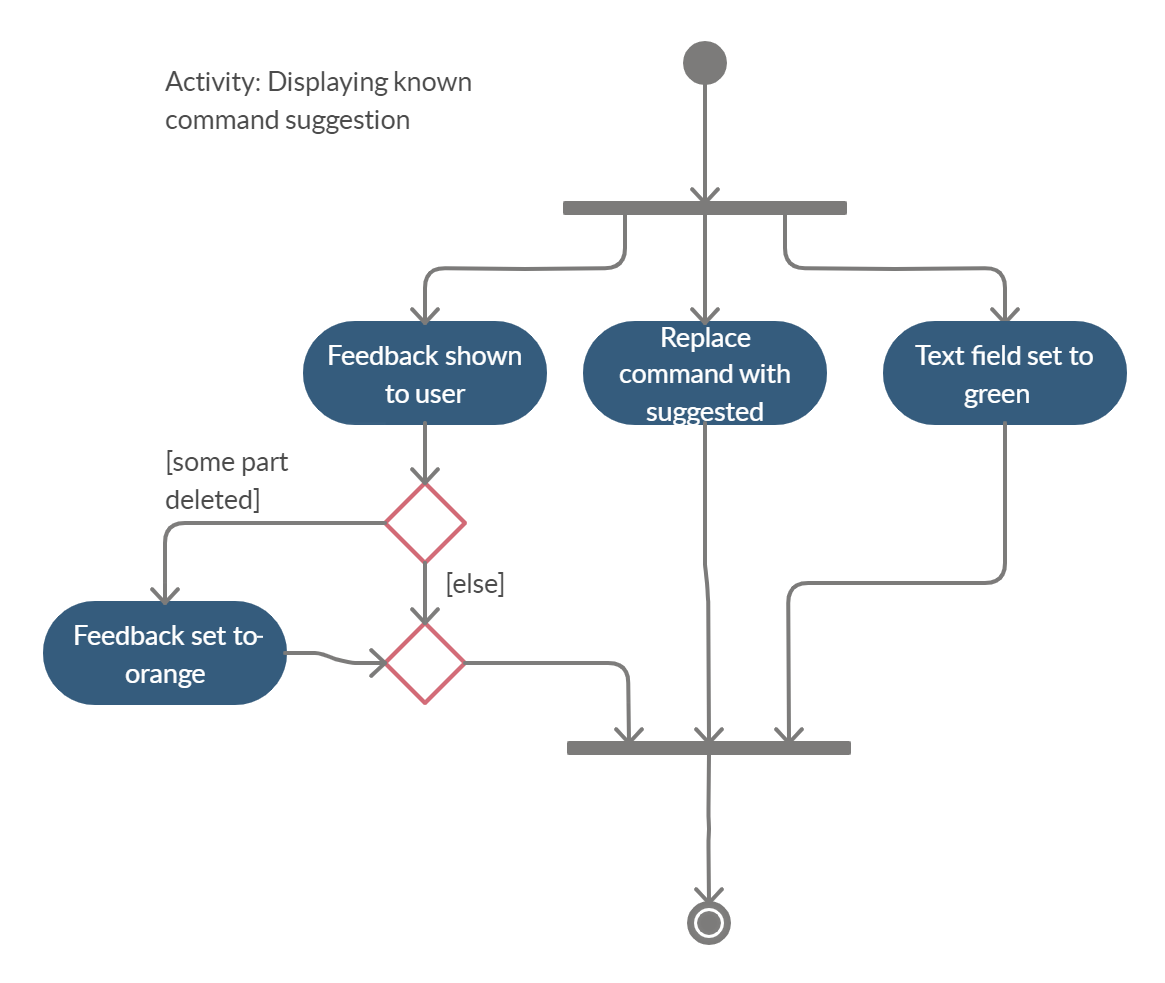
-
CommandTextFieldis set to green -
CommandTextFieldtext is replaced by the suggested command -
Feedback is also provided on what changes have been made
-
If input has been removed,
ResultDisplayis set to orange
-
3.3.5. Unknown Command UI
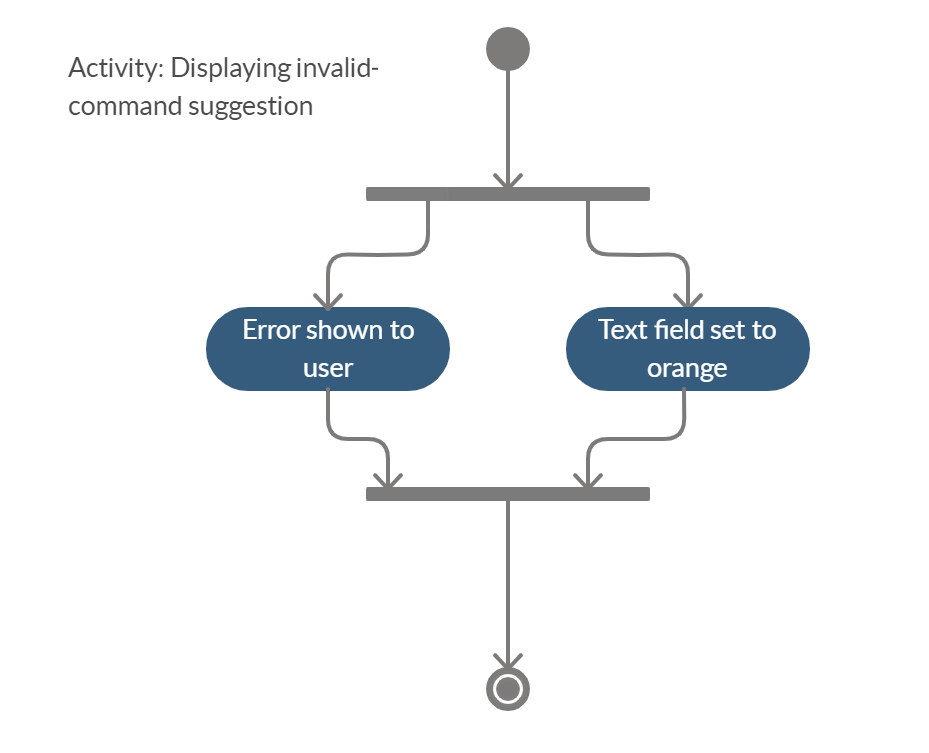
-
CommandTextFieldis set to red -
CommandTextFieldtext is unchanged -
Feedback is provided that command word is not recognized
3.3.6. Prefix Completion

Here we take a closer look at how prefix completion is implemented. We iterate through every word of the user’s input and then check if the word is a valid task field. If it is, we append the prefix and update the hasPrefix boolean to true so that we don’t append duplicate prefixes. The input is then updated and we continue iterating.
3.3.7. Index Completion
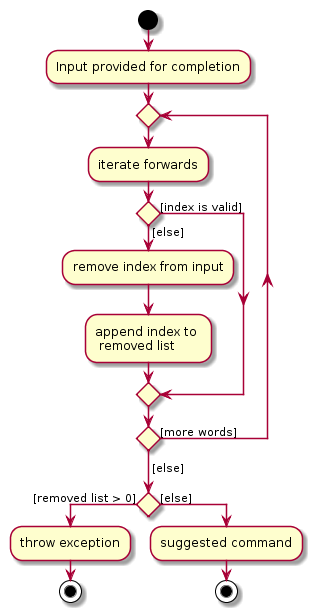
Similar to before, we iterate through the arguments and we remove indexes that are either out of the displayed TaskList size or that is not a positive integer. We then append it to a removed list so that we can inform the user what input has been removed.
3.3.8. Sort field Completion
Sort field completion is done by iterating through all arguments word by word and performing the auto complete checks against all possible sort fields. The auto complete checks were the same as the above criteria.
3.4. Enhanced Find
We’ve built upon the existing find function in AB-3 to filter tasks based on phrases (with some degree of typing errors) and based on task tags.
|
The filtered list is not maintained after the application closes |
3.4.1. Implementation
API : FindCommand.java
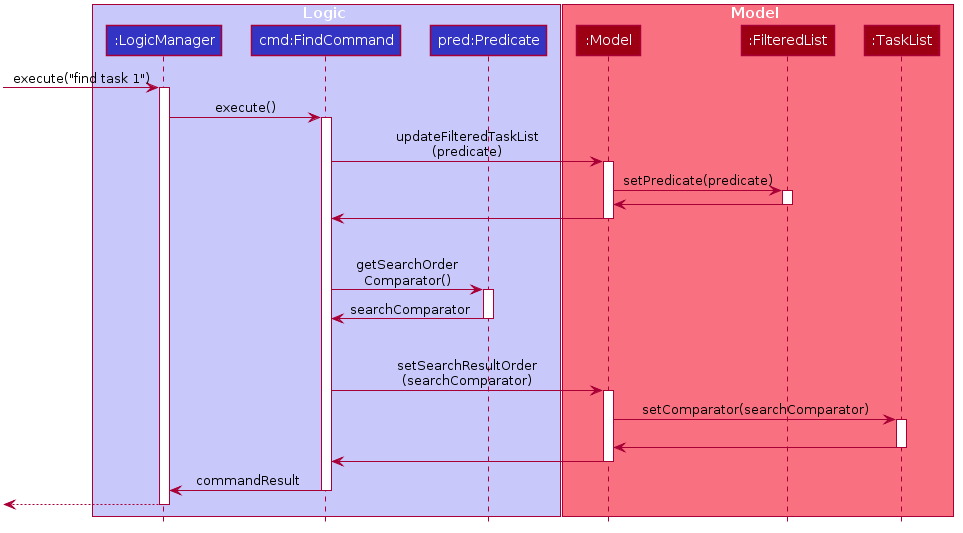
-
After setting the predicate on the model and
FilteredList, theFilteredListwill apply the Test method of the predicate.-
The test method calculates a score for every task and only displays tasks with score < 2.
-
-
A comparator is then retrived from the Predicate by comparing Tasks based on their score and is used to sort the filtered list to show the more relevant searches first
-
Lower scores means a more relevant task to the search term.
-
Tasks with lower scores will preceed those with higher scores based on the comparator.
-
|
Any existing comparator set by previous sort commands is replaced by the find command’s relevance comparator. |
3.4.2. Predicate
Scoring decision
The score is first initialized to 2 and is later replaced by name score if the name score is lower than 2. We then subtract tag score from it to get the final score.
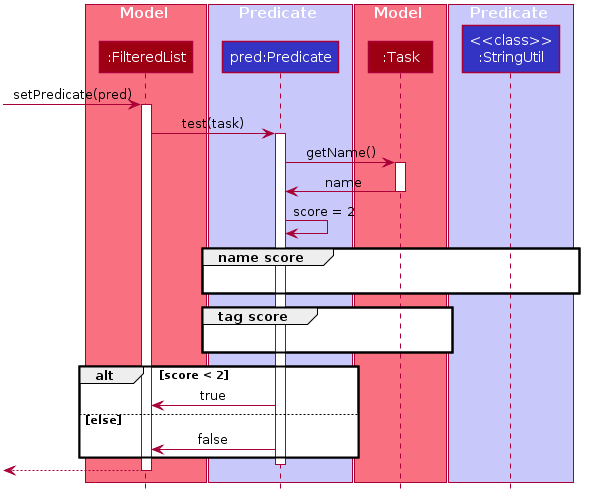
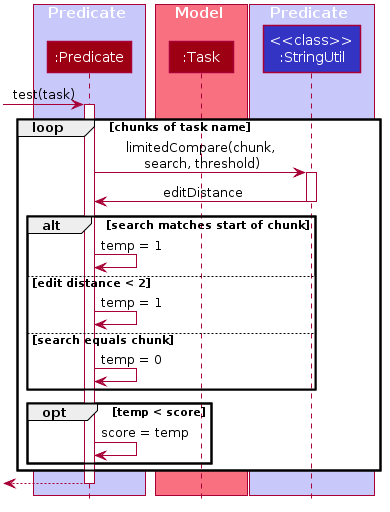
Name scoring
Please refer to the above’s name score group
-
The name score of a task is the minimum score of all chunks of a task.
-
A chunk is a String subsequence of the task name that has the same number of words as the search term.
-
-
We iterate through all chunks of the task name and calculate a score for each chunk.
-
Here is how we set the score for each chunk:
-
edit distance between one of the chunks and the search term < 2, chunk score is set to 1.
-
search term matches the start of one of the chunks, chunk score is set to 1.
-
one of the chunks is the same as the search term, chunk score is set to 0.
-
else chunk score is 2.
-
-
We then get the minimum of these chunk scores.
Tag scoring
For every tag in the search term that appears in a Task, we increment the tag score by 1.
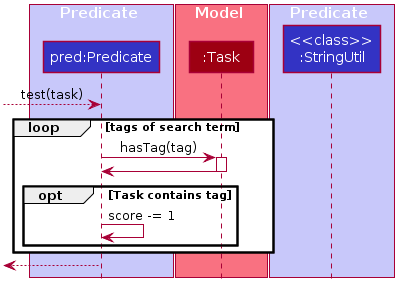
Final score
final score = name score - tag score. Search results are displayed in ascending order of final score.
Design considerations
-
The idea is to first ensure that tasks that are too different are not shown while allowing some degree of typo error on the user’s end when searching for a task.
-
This is supported by the use of edit distance and a small threshold.
-
-
Next we also wanted the user to be able to find a task name without searching the full name.
-
We show tasks who have a chunk who’s start matches the search term.
-
-
We also wanted to allow users to search by tags.
-
Thus tag score is introduced.
-
-
While the score helps to determine which tasks to show, it serves another job in providing the search relevance so that while accommodating for some degree of error from user input, they are still seeing what’s more relevant first.
-
Users can also narrow their search by performing find with more tags or a more complete task name so that only that task has a chunk that matches.
-
-
We chose to not use edit distance for search terms of string length less than 3 as this would bring about alot of false positives given that that the edit distance between words of length < 3 will easily be 1.
3.5. Pomodoro
Pomodoro is activated by the pom command. It follows the same execution flow as many of the other commands in BBProductive.
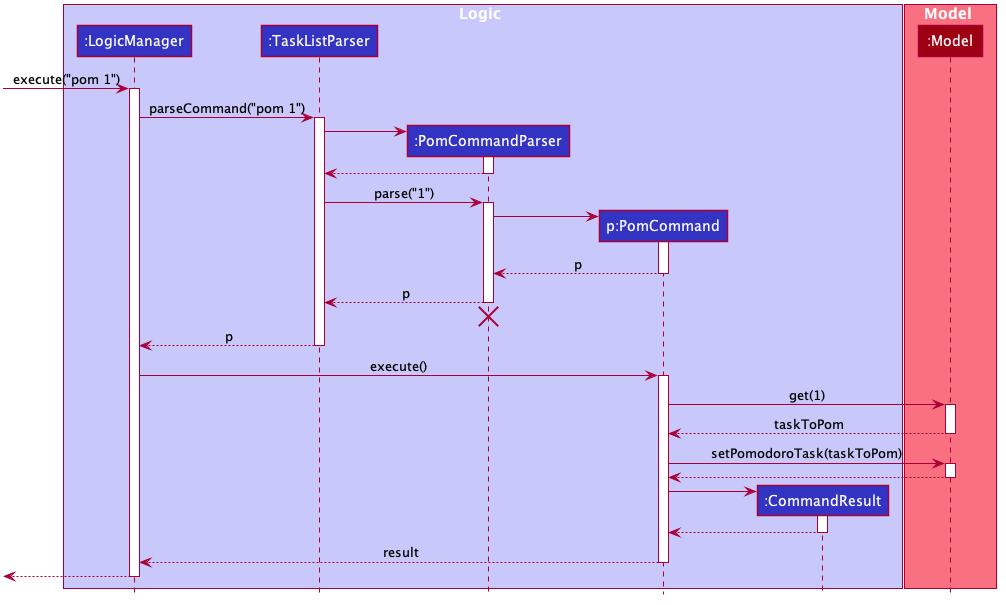
3.5.1. Implementation
Pomosoero’s features are implemented mainly in seedu.address.logic package. The PomodoroManager class is used to maniulate the timer and configure the relevant UI elements. The timer is facilitated by javafx.animation.Timeline.
When the PomCommand is executed, the PomodoroManager will handle the actual timer systems and update the relevant entities in the app. This is evident in the following sequence diagram.

Through the use of the Pomodoro feature, there are occasions where the app has to prompt the user for specific input in order to progress. This behaviour flow is represented in the Pomodoro Acctivity diagram.
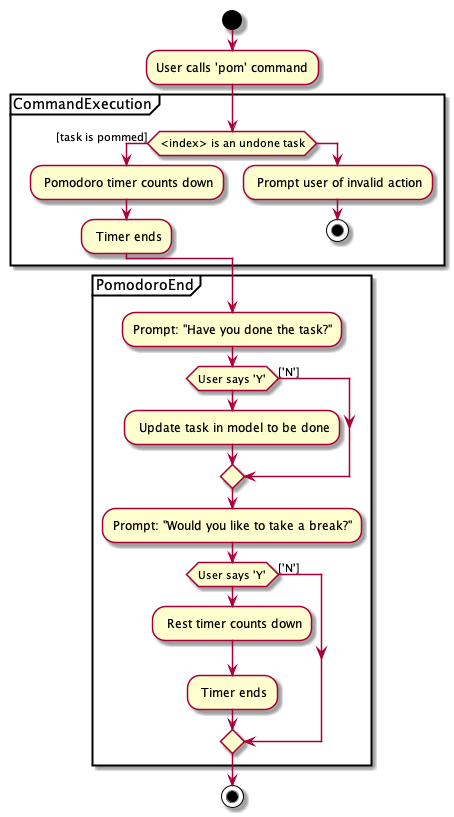
The PomodoroManager maintains a prompt_state indicating what the app might be prompting the user at a given time.
Pomodoro Prompt States
-
NONE: There is no particular prompt happening. The default state when the app is in the neutral state. (i.e. No pomodoro running.) -
CHECK_DONE: This state occurs when a timer expires during a Pomodoro cycle. -
CHECK_TAKE_BREAK: This state occurs after user response has been received in the CHECK_DONE state. -
CHECK_DONE_MIDPOM: This state occurs when the user calls done on a task that is the Pomodoro running task.
Pomodoro has settings that can be configured by the user:
-
Pomodoro Time: This defines how long the Pomodoro work period is. The default is 25 minutes.
-
Break Time: This defines how long the breaks last in between Pomodoro periods. The default is 5 minutes.
This data is captured and stored in the Pomodoro class in seedu.address.model, which interacts with the app’s storage system. PomodoroManager also updates the Pomodoro model on what task is being run and the time remaining in a particular cycle. This allows the time progress to be persistent in between app closures and relaunches.
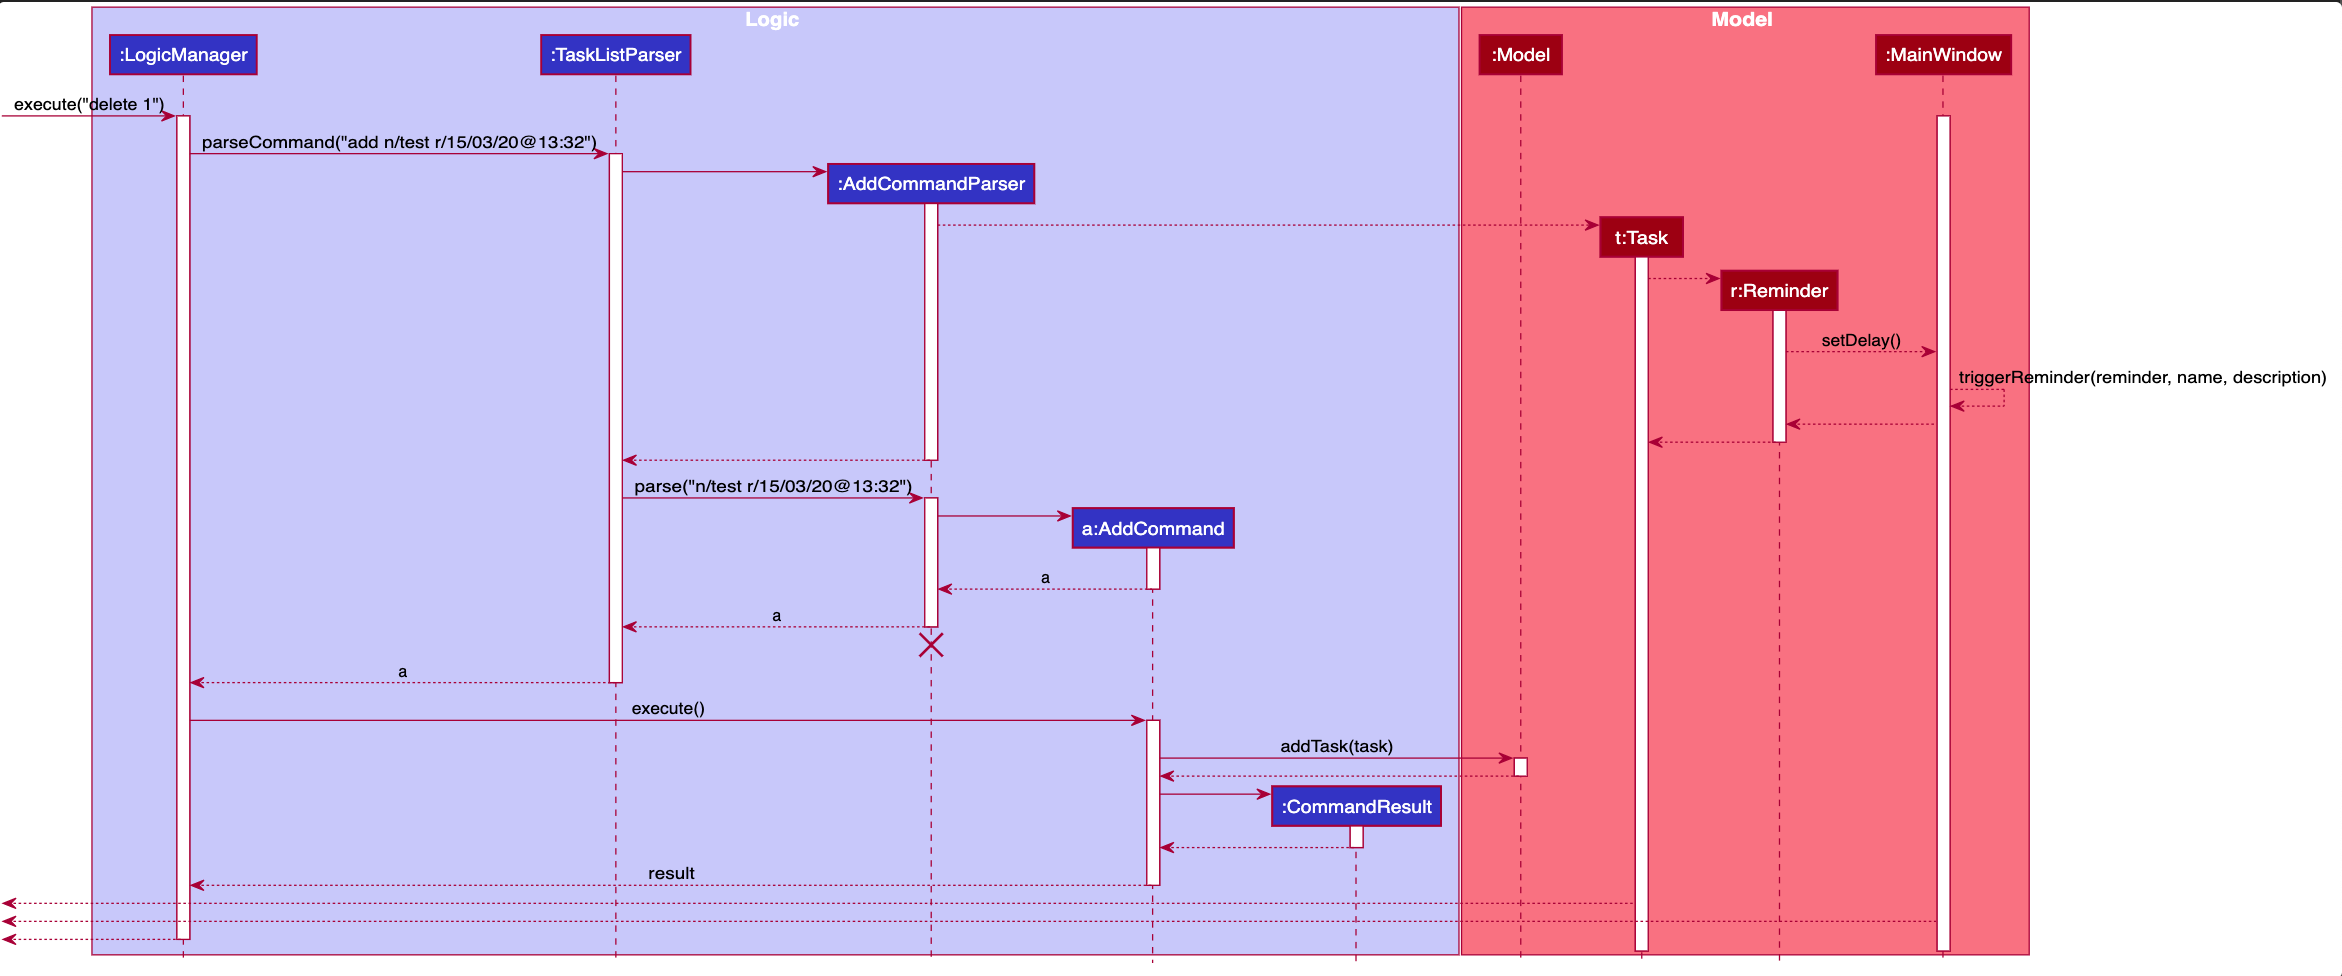
=== Reminders
The user’s reminder functionality is achieved by calculating the time delay from the current time and the time from the user input. This time delay as well as the Task name and description is passed to the MainWindow for the reminder to be triggered as a pop up at the right time.
3.5.2. Implementation
A DateTimeFormatter is used to parse the date time from the user input, which is just the date in the r/ flag when adding or editing a task, into a LocalDateTime object. This LocalDateTime is used to store the date and time information. When the reminder is instantiated, a setDelay method is called setting in motion the calculation of time delay between the current time and the reminder time, and triggering of reminder on the MainWindow. The reminder class is stored as an Optional in the Task class itself.
Reminder is stored as a string in the JsonAdaptedTask. This string contains the exact format of the date and time that the user inputs, this allows the same constructor to be used when the data is read and changed to a task and thus reminder object. A sequence diagram of the reminder flow is shown below for reference.
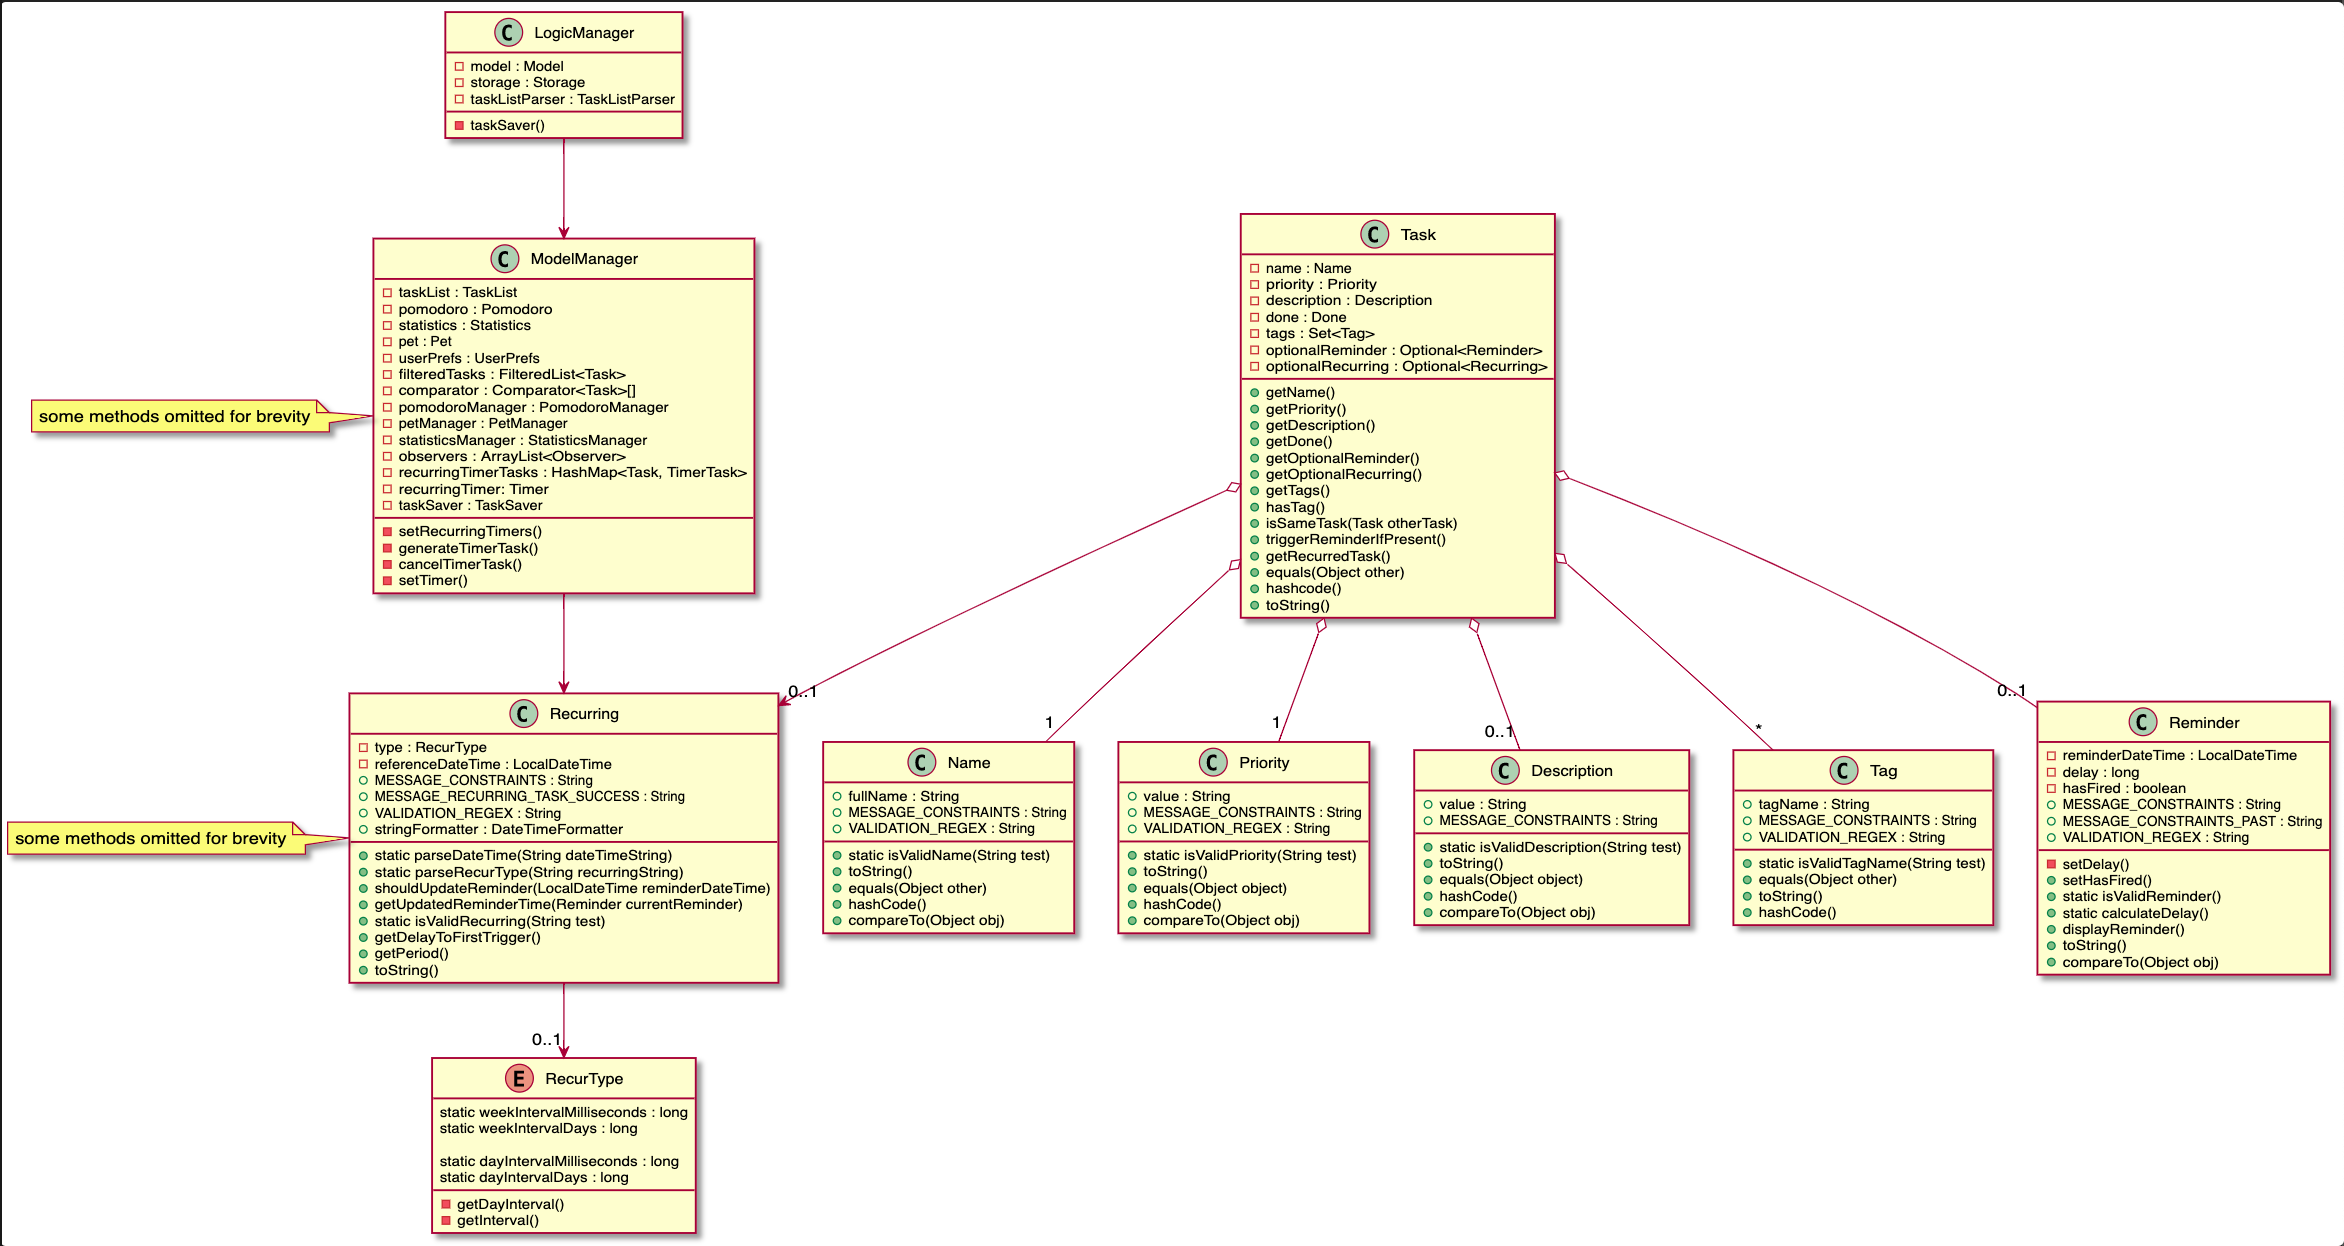
3.6. Recurring
The user’s recurring tasks functionality is twofold. Resetting the task to be unfinished after the stipulated time interval and resetting the task’s reminder date according to the stipulated time interval. The behaviour for this recurring feature is mainly represented in the activity diagram below.
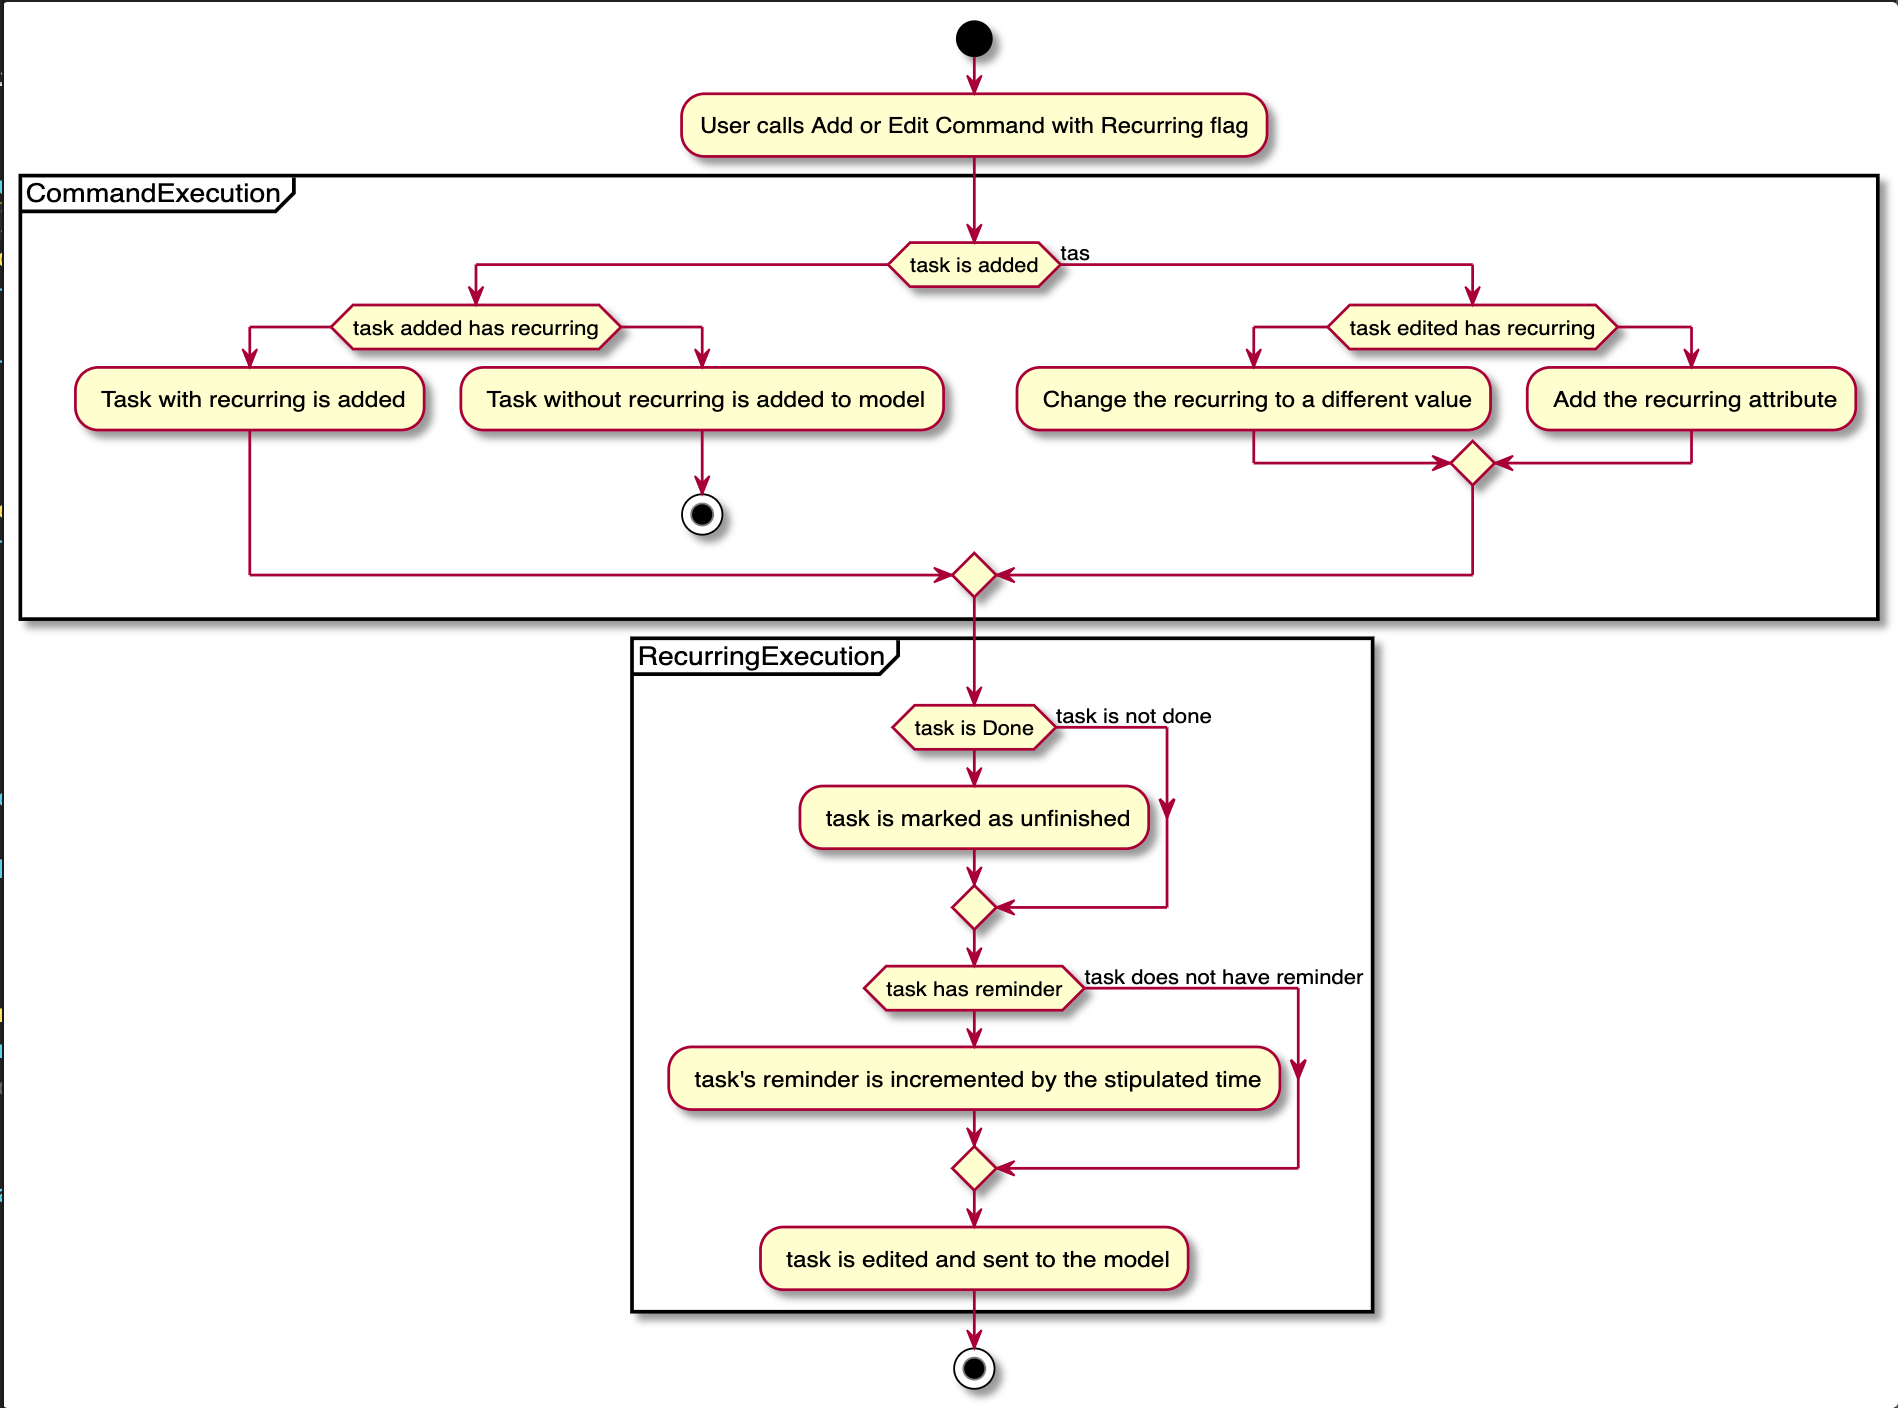
3.6.1. Implementation
The logic is mainly implemented in the Recurring class and ModelManager class in seedu.address.model, which interacts with the app’s storage system especially with respect to task storage. This Recurring instance is stored in Task as an optional field.
In the Recurring class, whenever a task is added or edited, the recurring type is then parsed to be either daily or weekly. Afterward, based on the time the recurring attribute is added, a reference LocalDateTime is noted in the Recurring instance itself. This ensures that the first recurring behaviour will trigger in the given interval with respect to that referenceDateTime and following the same interval afterwards.
The recurring behaviour is orchestrated in ModelManager whenever a task is added or edited, a setTask method is called that will generate a Timer and TimerTask. A TimerTask is the logic run to update the task, namely resetting the done and the reminder accordingly. The Timer schedules TimerTasks at a fixed rate based on the the time interval chosen, if it is daily it will be every 24 hours (but for testing purposes it will be every 60 seconds) and if it is weekly it will be every 7 days. There is only 1 Timer for the ModelManager that handles the scheduling of each TimerTask that corresponds to every task that has a recurring behaviour. On boot the Timer is canceled and replaced with a new instance, subsequently all the tasks are iterated through. Every task with a recurring attribute will have a TimerTask generated and scheduled accordingly.
The recurring behaviour triggered will set the task as undone. If a reminder exists and has been triggered, it will increment the reminder to be the next day or week depending on the interval set. When the recurring behaviour is triggered, the result display will show a message that the recurring task has been reset.
Additionally, a flag has been made to check if the task needs to be changed, if it does not it will not be unnecessarily updated in the Model. A class diagram of the tasks and all its attributes is shown below.
Recurring is stored as a string in the JsonAdaptedTask. This string contains the LocalDateTime information for the reference date as well as the type of interval itself. A special constructor for this string is used to reconstruct the recurring attribute when reading from storage.
3.7. Switch Tab Feature
The Switch tab feature allows the user to traverse between the Tasks, Statistics and Settings tabs.
The user can switch tabs through 2 main methods:
1. User calls a valid SwitchTabCommand that displays the appropriate tab defined.
2. User calls a valid command that changes the display of Tab B while he or she is on Tab A. In this scenario, Tab B will display automatically.
This behaviour is represented in the following activity diagram.
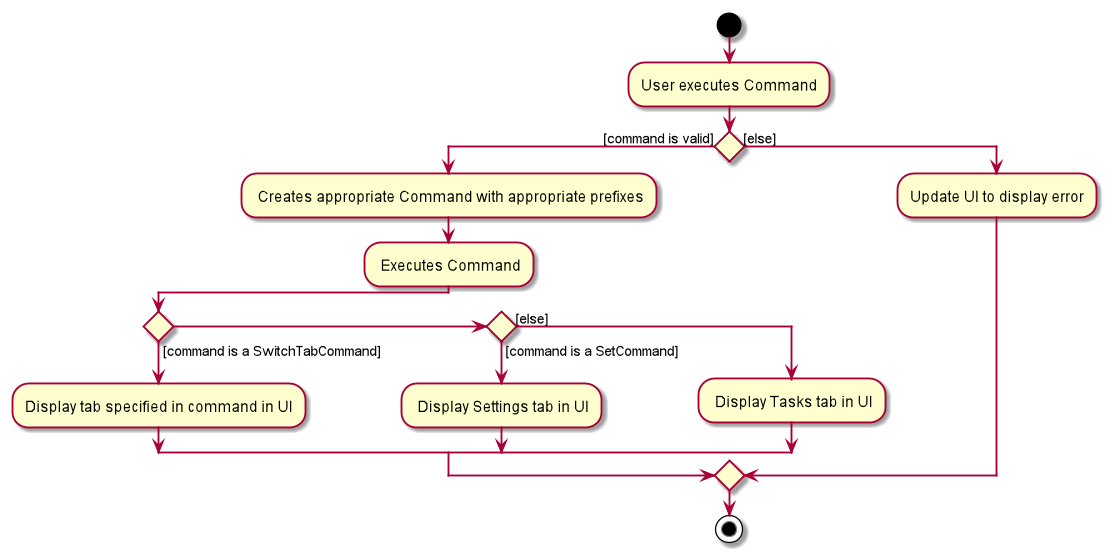
The mechanism of how SwitchTabCommand updates the Ui is described below.
Step 1. MainWindow executes the user input through logic and retrieves the SwitchTabCommandResult commandResult from Logic.
Step 2. MainWindow retrieves the tabToSwitchIndex from commandResult.
Step 3. MainWindow updates the tabToSwitchIndex tab through tabPanePlaceholder.
The following sequence diagram shows how SwitchTabCommand updates the tab in the Ui.

3.8. Statistics Feature
The Statistics feature allows the user to view information about their number of tasks completed and Pomodoro duration ran (in minutes) on a daily basis for the past CONSTANT_SIZE days.
CONSTANT_SIZE can be set to any number for any future developments. In our current implementation, we chose to store data for only the past 7 days to keep Statistics simple and intuitive for users.
|
3.8.1. Implementation
The Statistics feature is mainly supported by the Statistics class, which in turn is facilitated by the CustomQueue class. Its class diagram is given below.
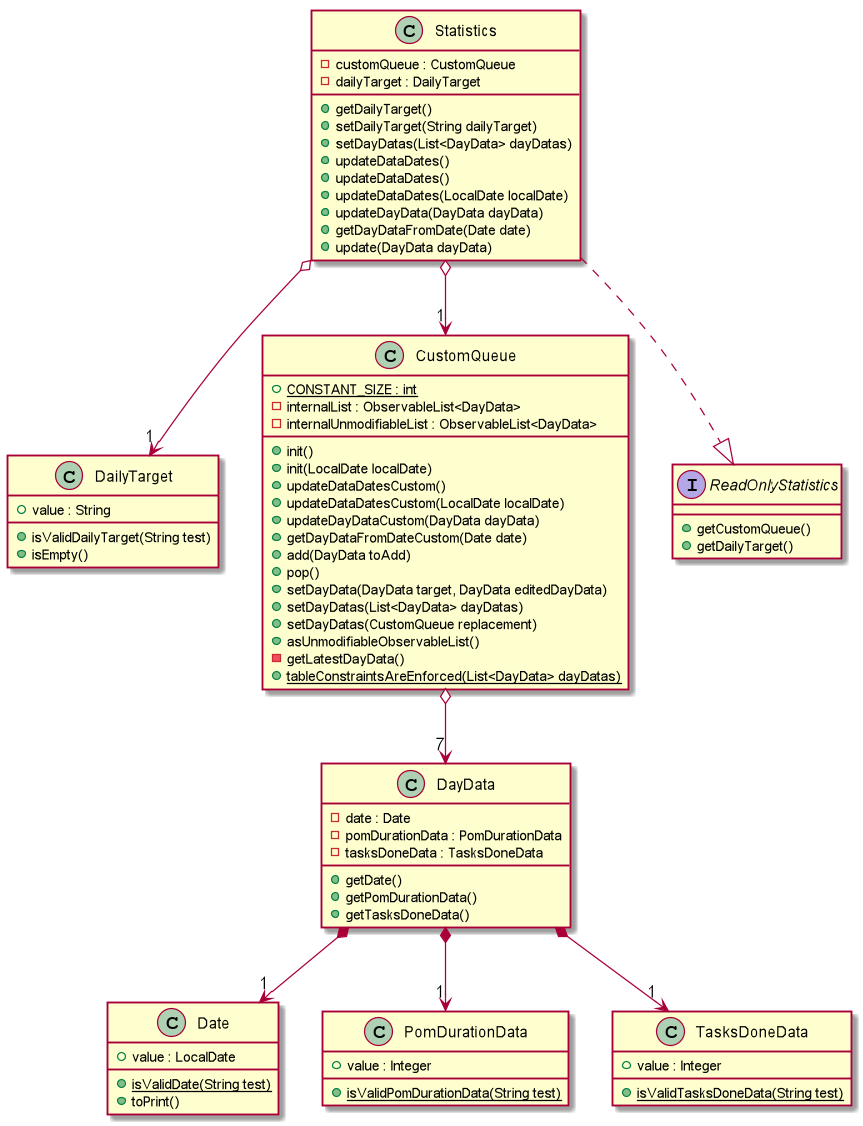
The CustomQueue class enforces the following constraints:
-
Size of
CustomQueuemust be ofCONSTANT_SIZEafter each method call throughStatistics. -
DayData dates in
CustomQueuemust be only 1 day apart between its elements, and sorted from oldest to latest date.
The CustomQueue class implements the following methods for other components to access or update its data:
-
Model#updateDataDatesStatistics- Updates data to current day while retaining stored data. -
Model#updatesDayDataStatistics- Replaces existing DayData in Statistics with new DayData of the same date. -
Model#getDayDataFromDateStatistics- Returns the DayData object from Statistics with the specified date.
The Statistics feature does not support any explicit commands. Instead, Ui is updated and displayed when the SwitchTabCommand 'stats' is called. The mechanism of this behaviour is described below.
Step 1. MainWindow receives the SwitchTabCommandResult commandResult from Logic.
Step 2. MainWindow calls StatisticsManager#updateStatisticsDisplayValues() which retrieve the latest Statistics from Model and generates the display information.
Step 3. MainWindow then retrieves these display information from StatisticsManager and sets this information in StatisticsDisplay.
SwitchTabCommand also switches the focused tab to the Statistics tab to display the results to the user.
|
The following sequence diagram shows how the Statistics is updated to the display.

3.8.2. Design considerations
Aspect: Data structure to support Statistics
-
Alternative 1 (current choice): Use a list that stores a fixed number of DayData objects, with elements being strictly 1 day apart and sorted from oldest to latest date.
-
Pros: Lightweight, does not store unnecessary data. Easy to pass data to generate graphs. Systematic removal of outdated data.
-
Cons: Need to enforce constraints in methods.
-
-
Alternative 2: Use a list with elements sorted from oldest to latest date.
-
Pros: Easy to implement.
-
Cons: Harder to pass data to generate graphs. Need to handle outdated dates.
-
Aspect: when to update StatisticsDisplay
-
Alternative 1 (current choice): Update when the user runs the command to view Statistics
-
Pros: Easy to implement.
-
Cons: Progress can only be viewed at the Statistics tab.
-
-
Alternative 2: Update when any changes are made to Statistics.
-
Pros: In the event of future developments, any component of Statistics can be displayed at all times.
-
Cons: Need to keep track of all instances that can modify Statistics' values.
-
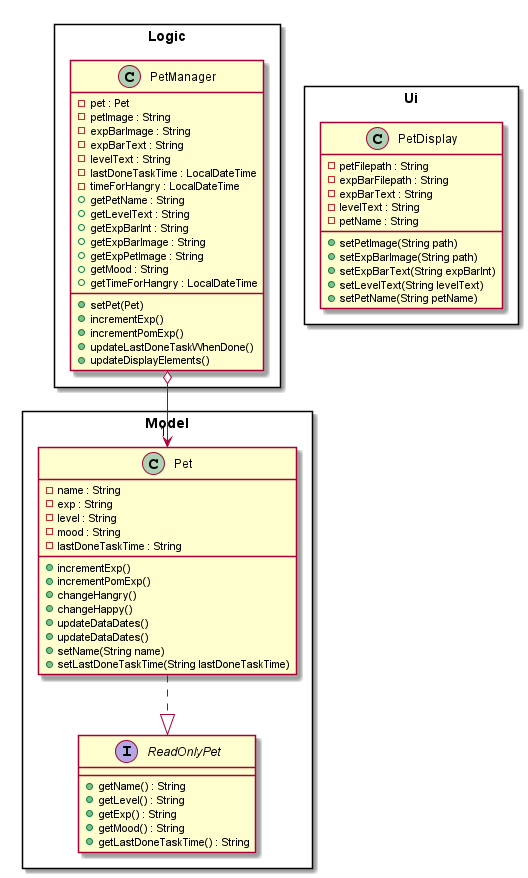
3.9. Pet
3.9.1. Implementation
The pet feature aims to provide a virtual pet for the app in order to motivate the user. The pet has three main components: the XP points, the evolution and the mood. To facilitate this function, a Pet class is created to represent the pet. A PetManager class is created to manage the pet via communications from MainWindow. Lastly, a PetDisplay class is created to handle the UI of the pet.
To exemplify the implementation for the components of the XP points and the evolution of the pet, an example usage scenario is given below.
Step 1. User finishes a task. User calls the done command for the task. MainWindow would execute this command and generate a DoneCommandResult object
Step 2. The MainWindow will update PetManager to increase XP points after the DoneCommandResult Object is received. This is done by calling the method PetManager#incrementExp. PetManager would then update XP points of Pet by calling Pet#incrementExp. This method also checks whether the XP points have reached the milestones for the levels and will update the level of the pet accordingly.
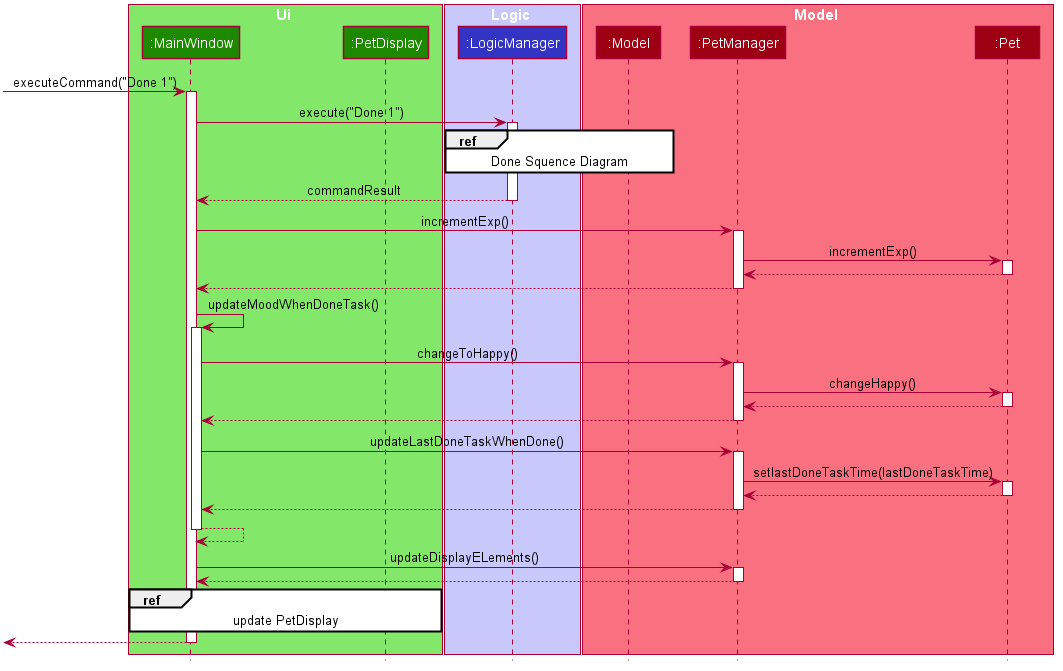
Step 3. Following the update of XP points, MainWindow also updates the mood of the pet. Supposedly, the pet is originally in "HANGRY" mood, MainWindow will call "MainWindow#updateMoodWhenDone" method to change the pet’s mood to Happy. It will also update the time of the last done task and reschedules a new timertask so that the pet will turn "Hangry" at the correct time. Lastly, this method also updates the elements
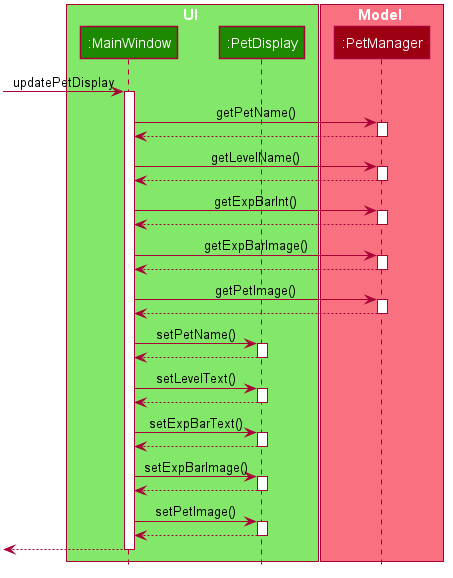
Step 4. MainWindow would then update the string of the filepaths for the respective UI elements in PetDisplay by executing the method PetManager#updateDisplayElements.
Step 5. Lastly, MainWindow will the update PetDisplay. The user will then see the UI be updated accodingly. For example, the progress bar would increase.
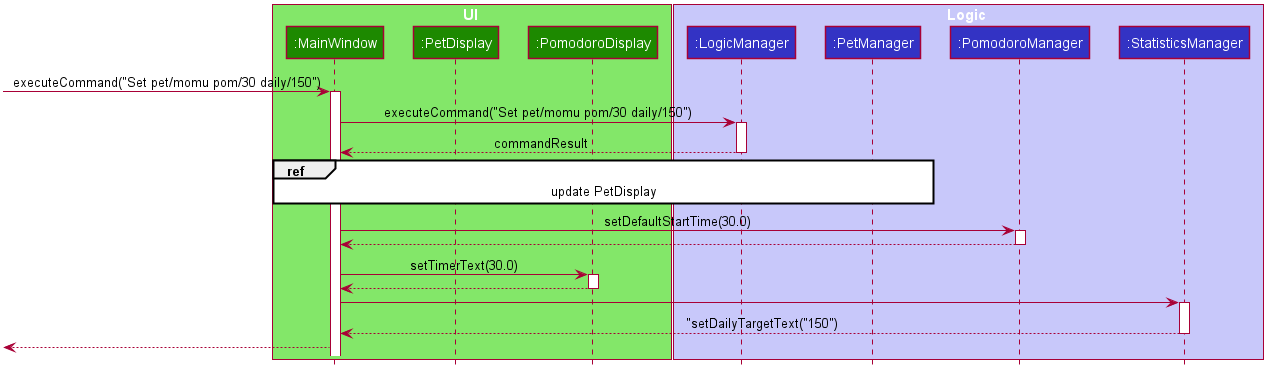
3.10. Set Commands
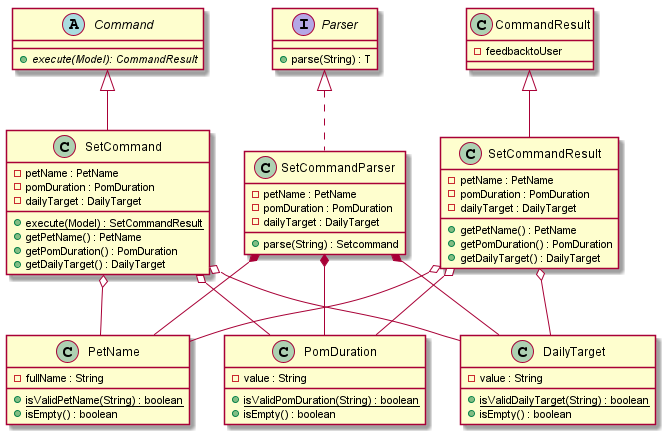
The Set Commands can be used to customise the features in BB Productive. It can be used to customised the name of the pet, the duration for pomodoro and the daily challenge target so as to better cater to the needs of the user.
Below is an example scenario when the user runs the set command.
Step 1. User runs the command "Set pet/momu pom/30 daily/150". MainWindow will take the user input and call upon LogicManager to pasrse it. LogicManager will the call AddressBookParser which in creates a SetcommandParser object and then parse the user argument. A SetCommand object is then executed and returned to logic.
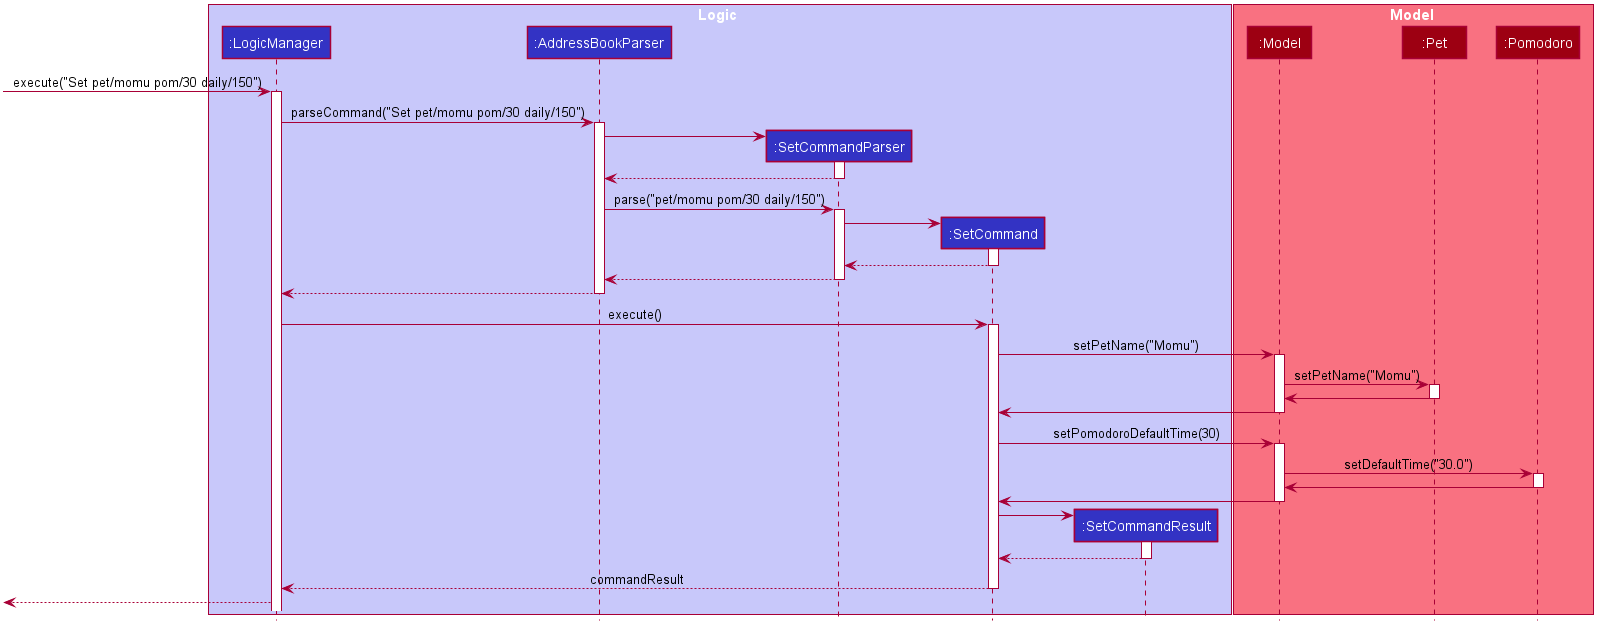
Step 2. Logic calls upon the method SetCommand#execute which eventually calls the methods Model#SetPetName and Model#setPomodoroDefaultTime. A SetCommandResult object is return once these methods are executed.
Step 3. Upon receiving the SetCommandResult object, MainWindow then calls the method MainWindow:UpdatePetDisplay to update the UI for Pet. It also calls PomodormoManager#SetDefaultStartTime and PomdooroDisplay#setTimerText to update the Ui of pomodoro. Lastly, StatisticsManager#setDailyTarget is called to update the value of the dailyTargetText.
3.11. Logging
We are using java.util.logging package for logging. The LogsCenter class is used to manage the logging levels and logging destinations.
-
The logging level can be controlled using the
logLevelsetting in the configuration file (See Section 3.12, “Configuration”) -
The
Loggerfor a class can be obtained usingLogsCenter.getLogger(Class)which will log messages according to the specified logging level -
Currently log messages are output through:
Consoleand to a.logfile.
Logging Levels
-
SEVERE: Critical problem detected which may possibly cause the termination of the application -
WARNING: Can continue, but with caution -
INFO: Information showing the noteworthy actions by the App -
FINE: Details that is not usually noteworthy but may be useful in debugging e.g. print the actual list instead of just its size
3.12. Configuration
Certain properties of the application can be controlled (e.g user prefs file location, logging level) through the configuration file (default: config.json).
4. Documentation
Refer to the guide here.
5. Testing
Refer to the guide here.
6. Dev Ops
Refer to the guide here.
Appendix A: Product Scope
Target user profile:
-
has a need to manage a significant number of tasks
-
prefer desktop apps over other types
-
can type fast
-
prefers typing over mouse input
-
is reasonably comfortable using CLI apps
-
need motivation to get things done
Value proposition: We integrate a Pomodoro-Pet environment into a full fledged task manager. The pet system serves to gamify the act of doing tasks, thereby motivating users, and the Pomodoro helps users get into a regular work/rest cycle. This integrationcovers all aspects of productivity in line platform. It covers motivation, organising of tasks and also how to go about doing them. This all in one solution is seldom found in other applications which implement maybe 1 or 2 of these features.
Appendix B: User Stories
Priorities: High (must have) - * * *, Medium (nice to have) - * *, Low (unlikely to have) - *
| Priority | As a … | I want to … | So that I can… |
|---|---|---|---|
|
new user |
see usage instructions |
refer to instructions when I forget how to use the App |
|
user |
view all current ongoing tasks |
manage my tasks and time |
|
user |
able to edit my task description |
make changes in the event something unexpected happens |
|
user |
add a task by specifying a task description only |
record tasks that needs to be done. |
|
user |
add a task by specifying a task description and a reminder |
record tasks that needs to be done by a specific period |
|
user |
add a task that is recurring |
record tasks that are either recurring daily or weekly without having to input it every day or week |
|
user |
sort upcoming tasks by date |
filter out the latest/oldest tasks according to my needs |
|
user |
sort my tasks by priority |
manage my tasks |
|
user |
delete a task |
remove tasks that I no longer care to track |
|
user |
utilise the Pomodoro technique to break down my work into structured intervals |
boost productivity and keep track of time |
|
user |
be able to remind myself on when I plan to work on a task |
be on track to complete my tasks |
|
user |
get a visual cue from my pet to prompt me to do work |
be motivated to work when my productivity is low |
|
user |
keep track of the time spent on each task |
check my progress |
|
pro user |
navigate commands using shortcuts |
save more time |
|
pro user |
customise the rate at which I should do work in the Pomodoro |
fit my workstyle better |
|
pro user |
be able to remind myself on a recurring basis for repetitive tasks |
be on track to complete my tasks, including those that are repetitive and also done on a recurring basis |
|
user |
view the total number of tasks/duration spent on tasks I have done over a period of time |
track my productivity over different periods |
|
user |
view the durations in which I have currently spent on different tasks |
better allocate my time |
|
user |
see my pet grow because of my productivity |
am more motivated to stay productive |
|
user |
be greeted by a cute mascot |
feel happy and motivated to do work |
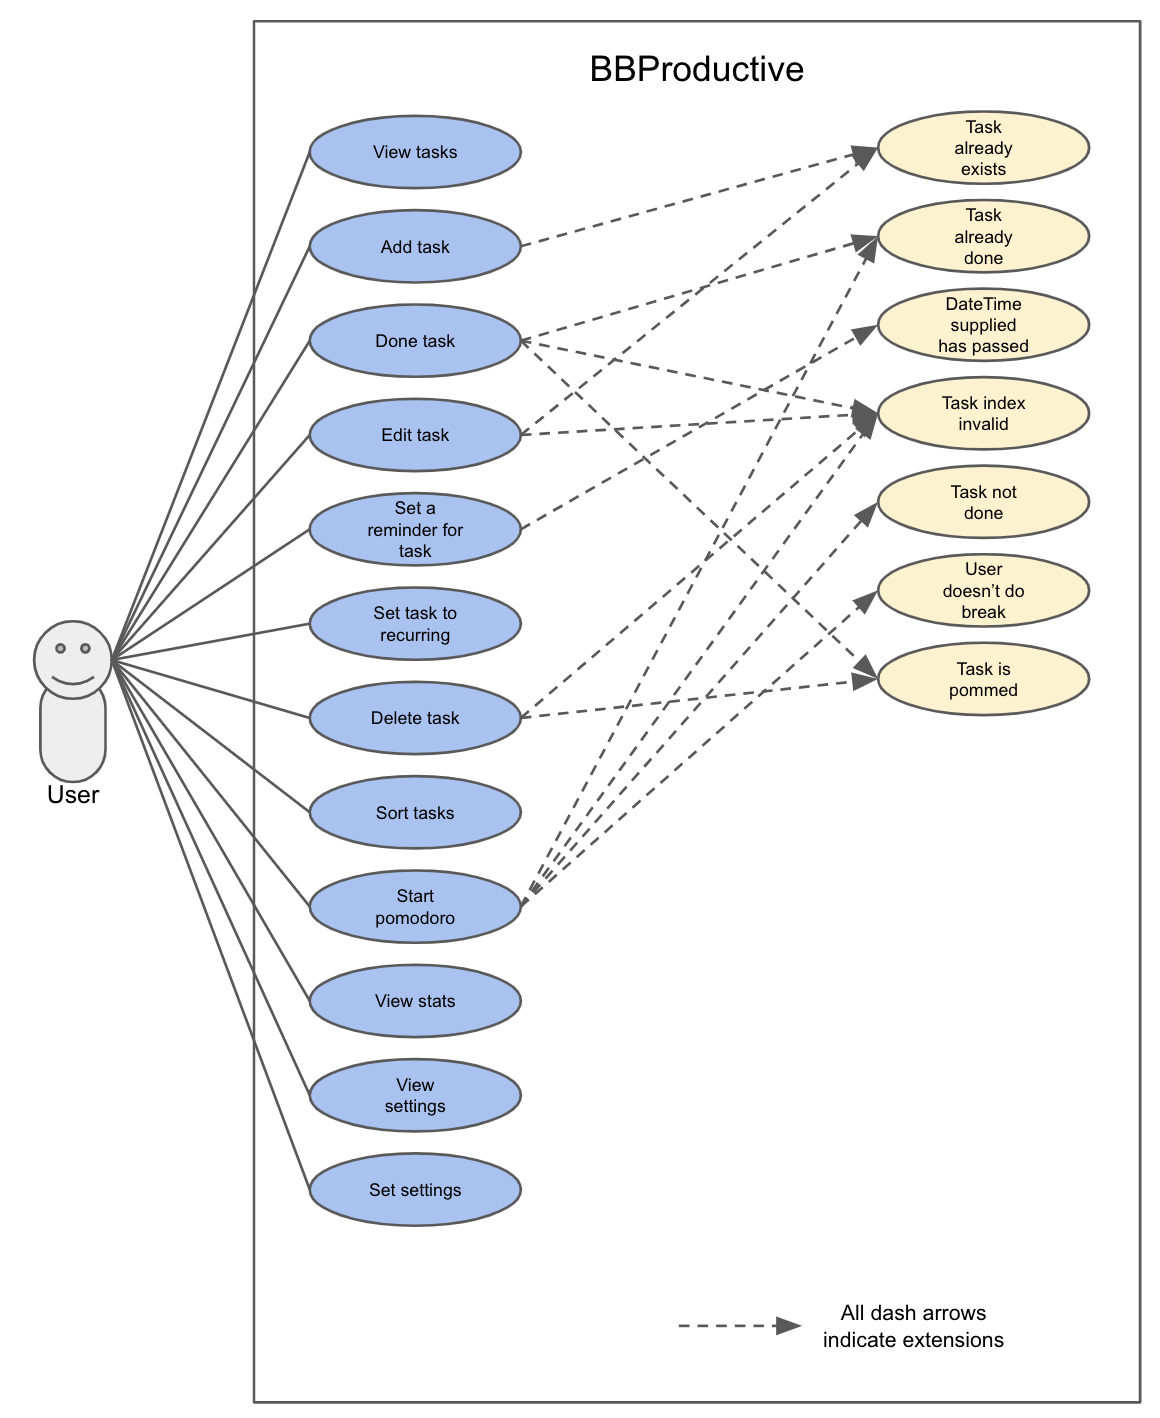
Appendix C: Use Cases
(For all use cases below, the System is BBProductive and the Actor is the user, unless specified otherwise)
Use Case: UC01 - View tasks
MSS
-
User requests to see the task list.
-
BB Productive displays the view under the tasks tab.
Use case ends.
Use Case: UC02 - Add task
MSS
-
User requests to add a task to the task list.
-
BB Productive shows view with updated task list.
Use case ends.
Extensions
-
1a. Task of the same name already exists.
-
1a1. BBProductive shows "This task already exists in the task list" in response box.
Use case ends.
-
Use Case: UC03 - Done task
MSS
-
User requests to set a task to done.
-
BB Productive shows view with updated task list.
Use case ends.
Extensions
-
1a. Task specified by user already marked as done.
-
1a1. BBProductive shows "Task has already been marked as done!" in response box.
Use case ends.
-
-
1b. User fed in an invalid index.
-
1b1. BBProductive shows "Invalid command format! " in response box.
Use case ends.
-
-
2a. A pommed task is among the tasks to be set to done.
-
2a1. BBProductive prompts user if they want to
pomanother task, orNto return the app to neutral. -
2a2. If user
pomanother task, use case resumes at stage 2 of UC09.Use case ends.
-
Use Case: UC04 - Edit task
MSS
-
User requests to update a task with updated fields and informs the task list.
-
BB Productive shows view with updated task list.
Use case ends.
Extensions
-
1a. New task name matches that of another task.
-
1a1. BBProductive shows "This task already exists in the task list." in response box.
Use case ends.
-
-
1b. User fed in an invalid index
-
1b1. BBProductive shows "Invalid command format! " in response box.
Use case ends.
-
Use Case: UC05 - Set a reminder for a task
MSS
-
User requests to set a task with a Reminder.
-
BB Productive creates/updates a task and shows the view with updated task list.
-
A reminder pops up when the specified time has elapsed.
Use case ends.
Extensions
-
1a. New task name matches that of another task.
-
1a1. BBProductive shows "This task already exists in the task list." in response box.
Use case ends.
-
Use Case: UC06 - Set a task to recurring
MSS
-
User requests to set a task to be a recurring task.
-
BB Productive creates/updates a task and shows the view with updated task list.
-
A reminder pops up when the specified time has elapsed.
Use case ends.
Extensions
-
1a. New task name matches that of another task.
-
1a1. BBProductive shows "This task already exists in the task list." in response box.
Use case ends.
-
Use Case: UC07 - Delete task
MSS
-
User requests to list tasks.
-
BBProductive shows a list of tasks.
-
User requests to delete a specific person in the list.
-
BBProductive deletes the task.
Use case ends.
Extensions
-
1a. New task name matches that of another task.
-
1a1. BBProductive shows "This task already exists in the task list." in response box.
Use case ends.
-
-
1b. User fed in an invalid index.
-
1b1. BBProductive shows "Invalid command format!" in response box.
Use case ends.
-
-
1c. Task to be deleted is being pommed.
-
1c1. BBProductive shows "You can’t delete a task you’re pom-ming!" in response box.
Use case ends.
-
Use Case: UC08 - Sort tasks
MSS
-
User requests to list tasks.
-
BBProductive shows a list of tasks.
-
User requests to sort the list by one or more parameters.
-
BBProductive creates a new view and updates the task list view.
Use case ends.
Use Case: UC09 - Start pomodoro
MSS
-
User requests to start pomodoro on a specific task.
-
BBProductive starts timer and sets task-in-progress to said task.
-
Pomodoro timer expires.
-
BBProductive sets task-in-progress to null and prompts user if user has done the task.
-
User replies the affirmative.
-
BBProductive shows view with updated task list with done task. Pet adds additional points.
-
BBProductive prompts user if user wants to do break time.
-
User replies the affirmative.
-
BBProductive starts break timer.
-
Break timer expires.
-
BBProductive returns to neutral state.
Use case ends.
Extensions
-
1a. User fed in an invalid index.
-
1a1. BBProductive shows "Invalid command format! " in response box.
Use case ends.
-
-
1b. Task specified by user already marked as done.
-
1b1. BBProductive shows "Task has already been marked as done!" in response box.
Use case ends.
-
-
5a. User replies negative.
-
5a1. BBProductive will leave the task list as is.
Use case resumes at stage 7.
-
-
5b. User replies with answer that is neither
Y/ynorN/n.-
5b1. BBProductive will leave the task list as is.
Use case resumes at stage 7.
-
-
8a. User replies negative.
-
8a1. BBProductive will start no timer.
Use case resumes at stage 11.
-
Use Case: UC10 - View stats
MSS
-
User requests to see the statistics tab.
-
BBProductive displays the view under the statistics tab.
Use case ends.
Use Case: UC11 - View settings
MSS
-
User requests to see the settings tab.
-
BBProductive displays the view under the settings tab.
Use case ends.
Use Case: UC12 - Set settings
MSS
-
User requests to update the app’s settings.
-
BBProductive takes the input and updates the app’s internal settings.
-
User requests to see the settings tab.
-
BBProductive displays the view under the settings tab with the updated preferences.
Use case ends.
Appendix D: Non Functional Requirements
-
Should work on any mainstream OS as long as it has Java
11or above installed. -
Should be able to hold up to 1000 tasks without a noticeable sluggishness in performance for typical usage.
-
A user with above average typing speed for regular English text (i.e. not code, not system admin commands) should be able to accomplish most of the tasks faster using commands than using the mouse.
-
Graphics should not be offensive to any culture in any way.
-
Product should be fully functional with CLI alone.
-
Storage should be done in a human readable and editable format.
-
Commands should be user-friendly.
Appendix E: Glossary
| Term | Detail |
|---|---|
Mainstream OS |
Windows, Linux, Unix, OS-X |
A time management method developed by Francesco Cirillo. Traditionally, cycles of 25 minutes of work and 5 minutes of rest. |
|
A snippet of text specified by the user that can be tracked (done/time spent). |
|
A cute little companion whom the player can care for and accessorise with more tasks being done. |
|
CLI |
Command Line Interface - a typing interface which is used to interact with the application |
Command |
Executes user input in the application |
CommandBox |
UI component that takes in user input |
ResultDisplay |
UI component that displays the feedback to the user |
FXML |
XML-based user interface markup language for defining user interface of a JaxaFX application |
TaskListCard |
UI component that displays information on an item |
TaskListPanel |
UI component that displays list of items |
JavaFX |
Software platform for creating and delivering desktop applications and rich Internet applications |
JSON |
An open-standard file format that uses human-readable text to transmit data objects consisting of attribute–value pairs and array data types |
Logic |
Handles user input for the application and returns the application’s output |
MainWindow |
Provides the basic application layout containing a pet and CLI sidebar and a task list interface with pomodoro timer |
Model |
Represents and exposes data in the task list, pet, pomodoro and statistics |
Parser |
Converts user input into a Command object |
ReadOnlyTaskList |
Provides an unmodifiable view of a task list |
Storage |
Manages data of the pet, pomodoro, tasklist and statistics in local storage |
Edit distance |
Integer calculated with the levenshtein distance that represents the number of changes to get from one string to another |
Appendix F: Instructions for Manual Testing
Given below are instructions to test the app manually.
| These instructions only provide a starting point for testers to work on; testers are expected to do more exploratory testing. |
F.1. Launch and Shutdown
-
Initial launch
-
Download the jar file and copy into an empty folder
-
In the home folder for BBproductive, launch the jar file by double clicking on the jar file itself.
Expected: Shows the GUI with a set of sample items. The window size may not be optimum.
-
-
Saving user preferences
-
Add or edit tasks accordingly
-
Re-launch the app by double clicking the jar file.
Expected: The same GUI list of tasks appears.
-
{ more test cases … }
F.2. Viewing Relevant Screens on command
-
On launch
-
Upon double clicking the JAR file, a GUI with the tasks list on the right panel appears.
-
-
On typing stats
-
Type stats in the input command box if you are in either the tasks or settings panel.
-
Expected: The right panel shows a GUI with multiple graphs.
-
-
-
On typing settings
-
Type settings in the input command box if you are in either the tasks or statistics panel.
-
Expected: The right panel shows a GUI with multiple fields for the settings.
-
-
-
On typing tasks
-
Type tasks in the input command box if you are in either the settings or statistics panel.
-
Expected: The right panel shows a GUI with the task list.
-
-
F.3. Adding a task
-
Adding from a screen with 0 tasks
-
First run
clearto clear all tasks if there are still tasks on the screen. -
Add a task by running the command
add n/test1
Expected: A task card appears in the tasklist with the name test1.
-
-
Adding from a screen with 1 task
-
Add another task by running the command
add n/test2
Expected: A task card appears in the tasklist with the name test2.
-
F.4. Editing a task
+ Prerequisite : Run clear and add a task using the command add n/editTest
-
Editing a task’s name
-
Run the command
edit 1 n/editedTest.
Expected: The command will result in the first task card’s name to change from editTest to editedTest.
-
-
Editing a task’s description
-
Run the command
edit 1 des/testDescription.
Expected: The command will result in the testDescription being the description of the task card.
-
-
Editing a task’s priority
-
Run the command
edit 1 p/2.
Expected: The command will result in the priority to change from low to medium on the task card.
-
-
Editing a task’s tags
-
Run the command
edit 1 t/test.
Expected: The command will result in the test tag to appear below the task name on the task card.
-
F.5. Adding and triggering a reminder for the task
-
Adding a task with a reminder.
Prerequisite: Take note of the current time plus 1 minute and date in the formatDD/MM/YY@HH:mm, for example if the current time is15/03/20@15:47then you should get the command ready15/03/20@15:48(but use the current date and time instead)-
Run the command
add n/reminderTest des/test r/DD/MM/YY@HH:mm
Expected: When the time has arrived a a pop up with a titlereminderTestand descriptiontestappears.
-
-
Editing a task to have a reminder.
Prerequisite: Take note of the current time plus 1 minute and date in the formatDD/MM/YY@HH:mm, for example if the current time is15/03/20@15:47then you should get the command ready15/03/20@15:48(but use the current date and time instead)-
Add a task
add n/editReminderTest des/testfirst and see it added on the tasklist panel -
Take note of the index of that task
-
Edit the task with
edit <index> r/DD/MM/YY@HH:mm
Expected: The task displays the reminder date in the task card. When the time comes, a pop up with a titleeditReminderTestand descriptiontestappears.
-
F.6. Adding a recurring attribute to a task
-
Adding a task with a recurring attribute.
-
Run the command add n/recurTest rec/t
-
Take note of the index of that task.
-
Run the done command done <index>
Expected: For testing purposes, the time delay is set to 60 seconds and it mimics a weekly recurring task. After 60 seconds, the done is set back to unfinished, with the tick being removed from the task card.
-
-
Editing a task to have a recurring attribute.
-
Add a task add n/editRecurringTest first and see it added on the tasklist panel
-
Take note of the index of that task
-
Edit the task with edit <index> rec/t
-
Run the done command done <index>
Expected: The task is marked as done at first. After 60 seconds, the done is set back to unfinished, with the tick being removed from the task card.
-
-
Adding a task with a reminder and recurring attribute.
Prerequisite: Take note of the current time plus 1 minute and date in the format DD/MM/YY@HH:mm, for example if the current time is 15/03/20@15:47 then you should get the command ready 15/03/20@15:48 (but use the current date and time instead)-
Run the command add n/recurReminderTest r/DD/MM/YY@HH:mm rec/t
-
Take note of the index of that task.
-
Run the done command done <index>
Expected: After 60 seconds, the done is set back to unfinished, with the tick being removed from the task card. After the reminder appears, the date displayed changes to the next week as it mimics a weekly recurring task albeit with a 60 second time delay, for example 15 March at 15:48 changes to 22 March at 15:48.
-
F.7. Sorting the task list
-
Add a bunch of tasks with different priorities, reminder dates and done values
-
Next perform sorts of various permutations of {(r-)priority, (r-)name, (r-)done, (r-)date} with spaces in between
-
sort fields that appear first are of higher priority than those that appear less
-
Expect the sort order of the tasklist to change, please reference our user guide for the specific changes to the tasklist if unsure
-
also expect the UI to change to display the most recent sort order
-
e.g. sort name priority → UI shows Tasks by name
-
Note that sort order is not maintained after application closes
-
-
F.8. Finding a task
-
Add a bunch of tasks with names with phrases that overlap and tags as well
-
Next you can perform one of the three permutations
-
find phrase -
find phrase [t/TAG]… -
find t/TAG [t/TAG]…
-
-
Expected order of search results: [those mentioned first should appear first]
-
tasks that have multiple tag matches
-
tasks that have full name match and tag match
-
tasks that have full name match or 2 tag matches
-
tasks that match a tag or phrase is partially matched
-
-
tasks that don’t meet any of the above won’t be shown
F.9. Auto complete
-
UI changes
-
Any known command words will have command text field set to green
-
Any unknown command words will have command text field set to red
-
Any input deletion or invalid indexes will have the result display set to orange
-
-
Test the command words
-
try partial start matches:
fi→find -
try typo matches:
fand→find-
All command word partial matches should work
-
-
asdf→asdf-
[command text field set to red]
-
-
try misspelled words by 1 character:
fand→find
-
-
Test prefix completion
-
Add:
add 20/10/20@10:30 3→add r/20/10/20@10:30 p/3 -
Edit:
edit 2 20/10/20@10:30 1→edit 2 r/20/10/20@10:30 p/1-
Ensure that the date values are valid
-
-
Pom:
pom 2 2.5→pom 2 tm/2.5
-
-
Test index checking
-
Edit:
edit -2→edit -2-
[result display shown to user and turned orange]
-
any non positive integer or integers outside of the displayed task list’s size will trigger the same deletion and feedback
-
-
delete/done:
done -2 a 1999 2→done 2-
[result display also set to orange]
-
-
-
Sort field completion
-
sort:
sort na prioruty blabla→sort name priority-
result display set to orange if input has been deleted
-
-
F.10. Activating Pomodoro
-
Activating Pomodoro.
-
Run the command
pom 1 -
Take note of the index of that task.
Expected: Pomodoro timer will start counting down from 25:00 minutes (default). Upon expiry of the time, app will prompt user in the response bubble, asking if done or no.
-
-
Activating Pomodoro with special time.
-
Run the command
pom 1 tm/0.5 -
Take note of the index of that task
Expected: Pomodoro timer will start counting down from 00:30 minutes. Upon expiry of the time, app will prompt user in the response bubble, asking if done or no.
-
-
Pausing and Resuming Pomodoro.
-
Run the command
pom 2 -
Then, run the command
pom pause. -
Then, run the command
pom continue.
Expected: After the firs command, Pomodoro timer will start counting down from 25:00 minutes (default). Afterpom pause, the timer will pause. Afterpom continue, timer will resume.
-
{ more test cases … } === Saving data
-
Dealing with missing/corrupted data files
-
{explain how to simulate a missing/corrupted file and the expected behavior}
-
{ more test cases … }
F.11. Switching tabs
-
Switching tabs by using the SwitchTabCommands.
-
Run the command
statsExpected: The right screen displays the 'Statistics' tab. The 'Statistics' tab should have an orange background to indicate selection.
-
-
Switching tabs by using other Commands.
-
Run the command
stats. -
Take note that the right screen displays the 'Statistics' tab.
-
Run the command
set daily/50. This is a SetCommand, and the right screen should automatically display the 'Settings' tab. Expected: The right screen displays the 'Statistics' tab. The 'Statistics' tab should have an orange background to indicate selection.
-
F.12. Checking Statistics
-
Check done tabulation
-
Run the command
stats. -
Take note of the number of tasks done on the current day.
-
Run the command
clear. -
Run the command
add n/new task. -
Run the command
done 1. -
Run the command
statsagain. Expected: The number of tasks done on the current day should increase by 1.
-
-
Check Pomodoro duration tabulation
-
Run the command
stats. -
Take note of the Pomodoro duration on the current day.
-
Run the command
clear. -
Run the command
add n/new task. -
Run the command
pom 1 tm/1. This runs the Pomodoro for 1 minute. -
Run the command
statsagain. Expected: The Pomodoro duration on the current day should increase by 1.
-